


Today we will learn how we insert data in database table. So we will have to create a database table and sequence. Let’s create those.
Database Design
Table Script
CREATE TABLE XXRD_EMP_TAB
(
EMP_ID NUMBER,
EMP_NAME VARCHAR2(100 BYTE),
DOB DATE,
GENDERA�VARCHAR2(1 BYTE),
COUNTRY VARCHAR2(50 BYTE),
STATE VARCHAR2(50 BYTE),
AGE NUMBER,
FILE_NAME VARCHAR2(50 BYTE),
FILE_CONTENT BLOB,
ATTRIBUTE_CATEGORY VARCHAR2(150 BYTE),
ATTRIBUTE1 VARCHAR2(150 BYTE),
ATTRIBUTE2 VARCHAR2(150 BYTE),
ATTRIBUTE3 VARCHAR2(150 BYTE),
ATTRIBUTE4 VARCHAR2(150 BYTE),
ATTRIBUTE5 VARCHAR2(150 BYTE),
ATTRIBUTE6 VARCHAR2(150 BYTE),
ATTRIBUTE7 VARCHAR2(150 BYTE),
ATTRIBUTE8 VARCHAR2(150 BYTE),
CREATED_BY NUMBER,
CREATION_DATE DATE,
LAST_UPDATED_BY NUMBER,
LAST_UPDATE_DATE DATE,
LAST_UPDATE_LOGIN NUMBER
);
Here is a point to note that if a data is populated with data through OAF, then the 5 WHO Columns are mandatory. Attributes columns were created to implement DFF. Ideally we can keep any number of attribute columns, in my case , I have kept only 8. GENDER will be used to store the sex of the employee, will be done via implemetation of poplist or picklist which is nothing but dropdown in traditional web development.COUNTRY and STATE will be used for storing country and state corresponding to a country, will be done via LOV and Dependent LOV implementation. AGE will be calculated as of Date of Joining through a package/procedure call. FILE_NAME and FILE_CONTENT will be used to store the filename and the content being uploaded. EMP_ID will be populated through Database Sequence generated at OAF end. EMP_NAME and DOB will be inserted by End User.
Sequence Script
CREATE SEQUENCE XXRD_EMP_ID_SEQ
START WITH 101
MAXVALUE 999999999999999999999999999
MINVALUE 1
NOCYCLE
CACHE 20
NOORDER;
OAF Project
Now let’s create Design Time Database Connection in Jdeveloper.
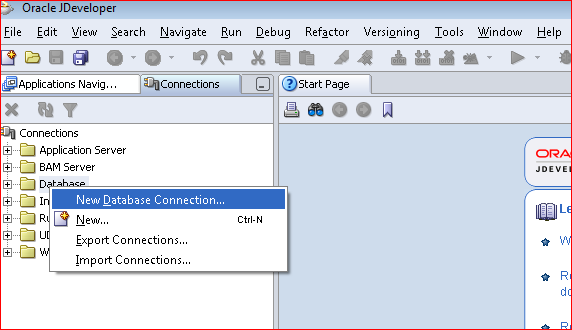
- Right Click on Database folder to create New Database Connection.
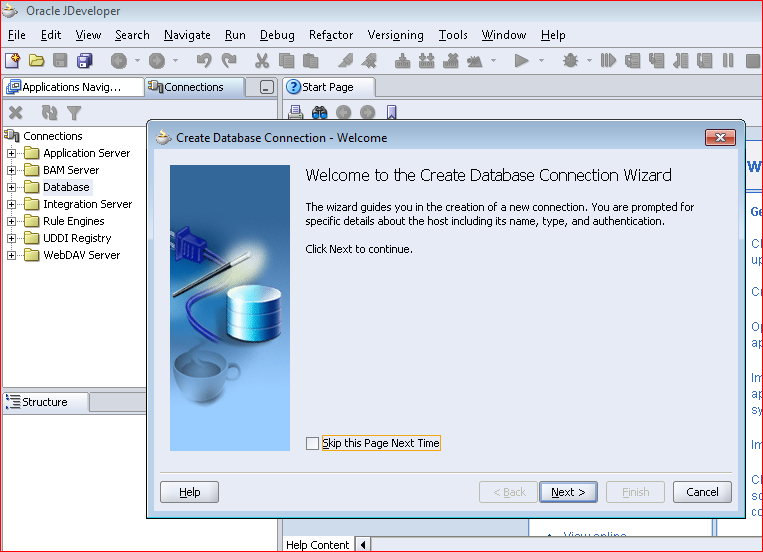
- Having launched the Database Connection Creation Wizard, Click on Next.
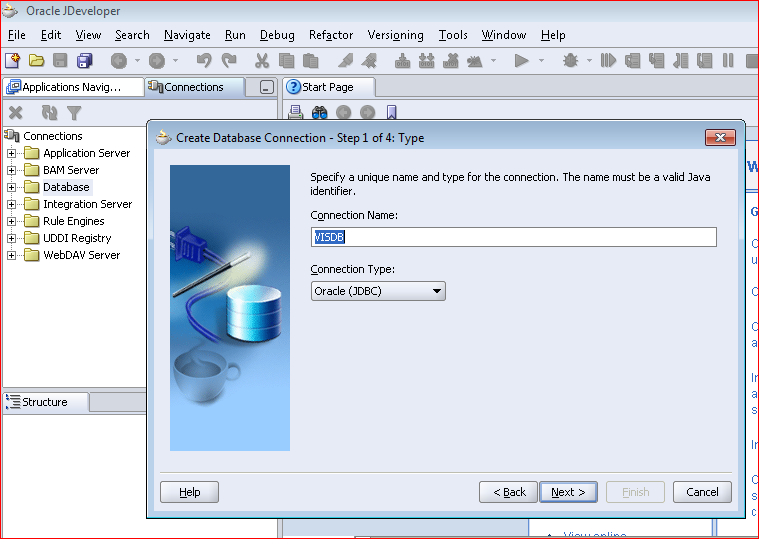
- Enter relevant Connection Name.
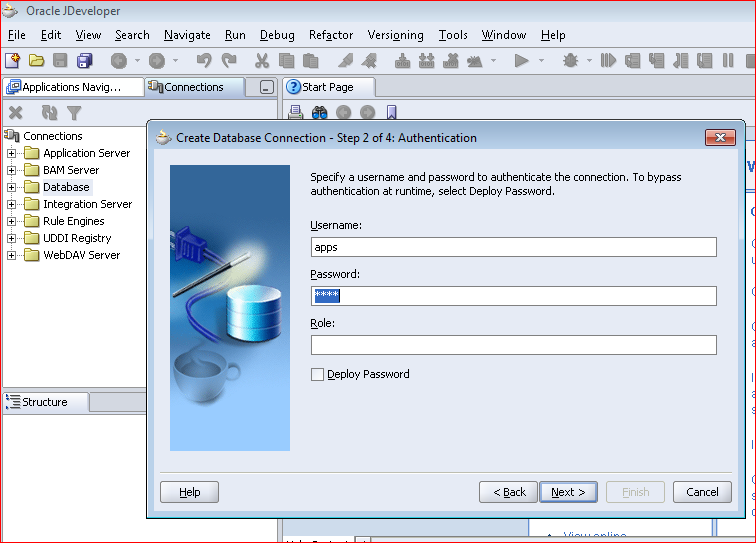
- Enter Username and Password for Database schema.(It’s APPS)
- Enter TNS Details for the APPS schema for the concerned Instance.
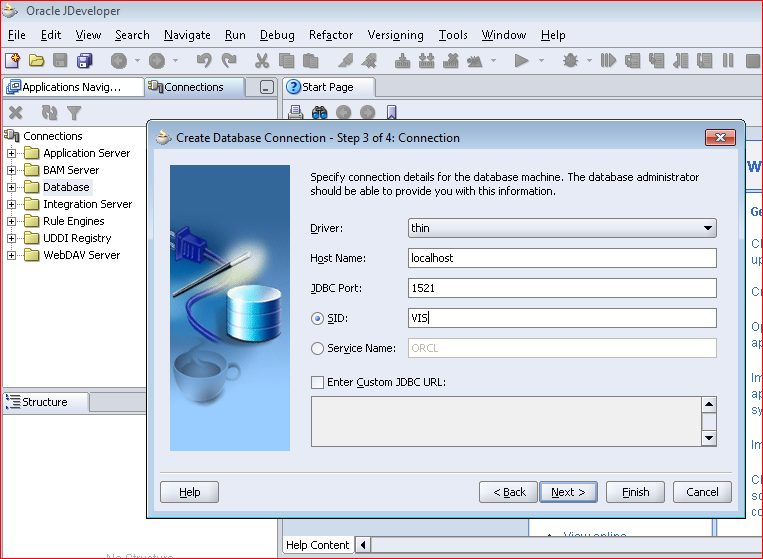
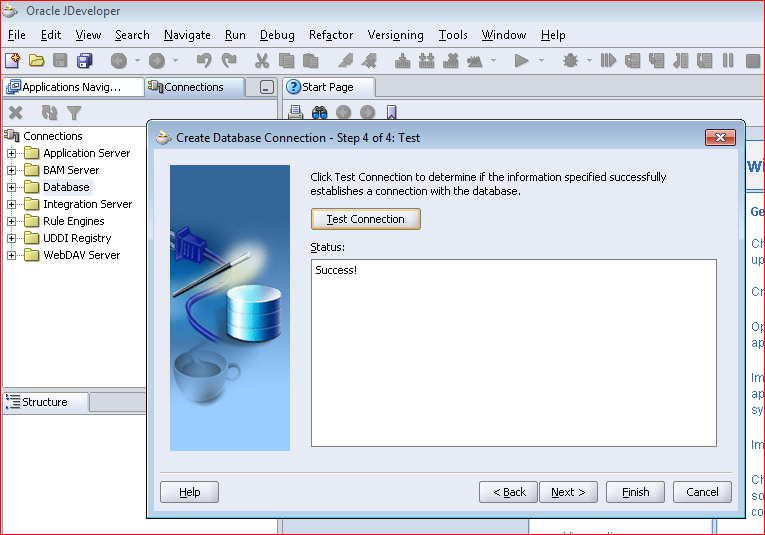
- Test the Connection.
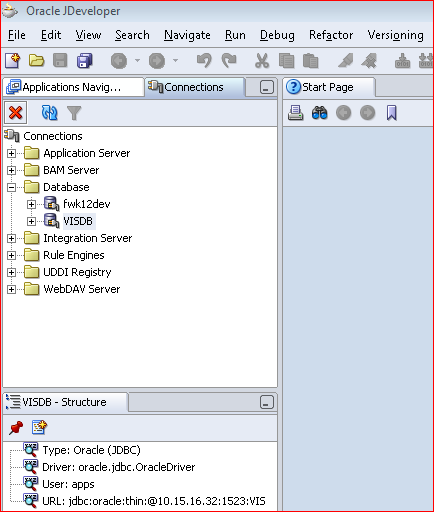
- Here is the connection enlisted.
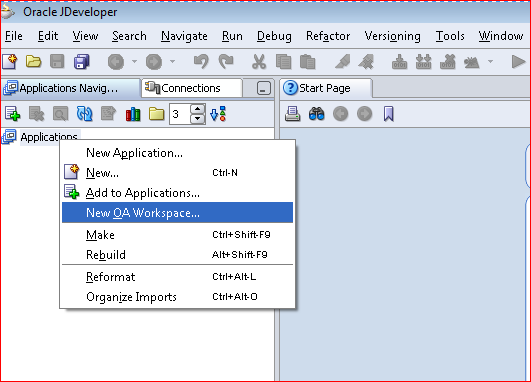
Let’s create Workspace and Project in Jdeveloper.
- Right Click on Applications to create New OA Workspace.
- Enter OA Workspace Name. Ensure directory is populated as set in the Environment Variable(JDEV_USER_HOME) as shown in the previous articleA�and Checkbox before “Add a New OA Project” A�is checked.
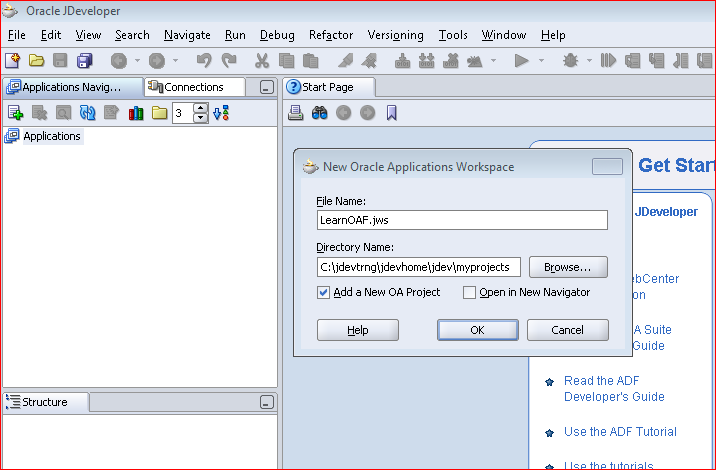
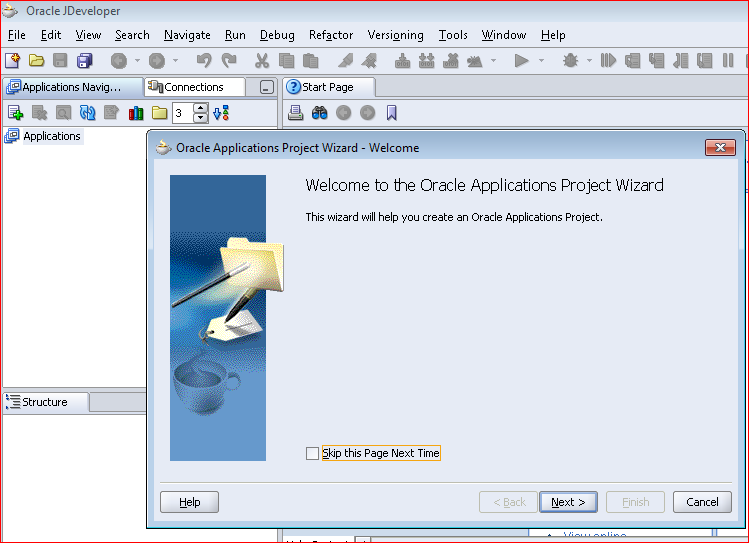
- Click OK and it will take you to Create Project Wizard.
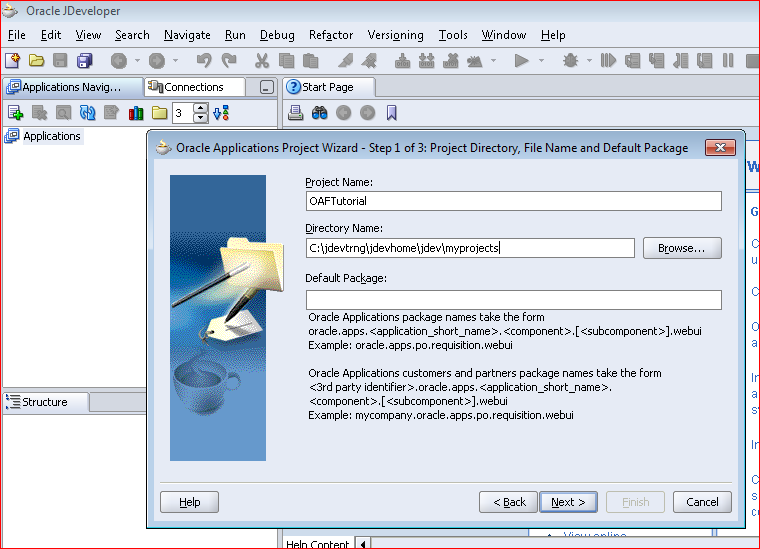
- Enter Project Name. Directory will get populated automatically from Environment Variable.
- Select the Design Time Database Connection being created. Click Next

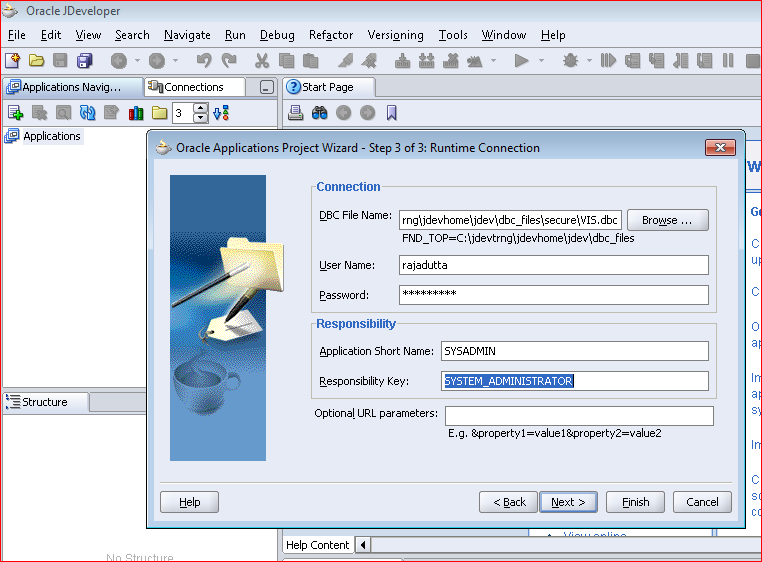
- Browse to enter .dbc file name.

- Then enter Application User Name and Password along with valid responsibility key and it’s application short name.
- Click Finish.
In order to create a CRUD application, we have to create the following objects in the same order mentioned below:
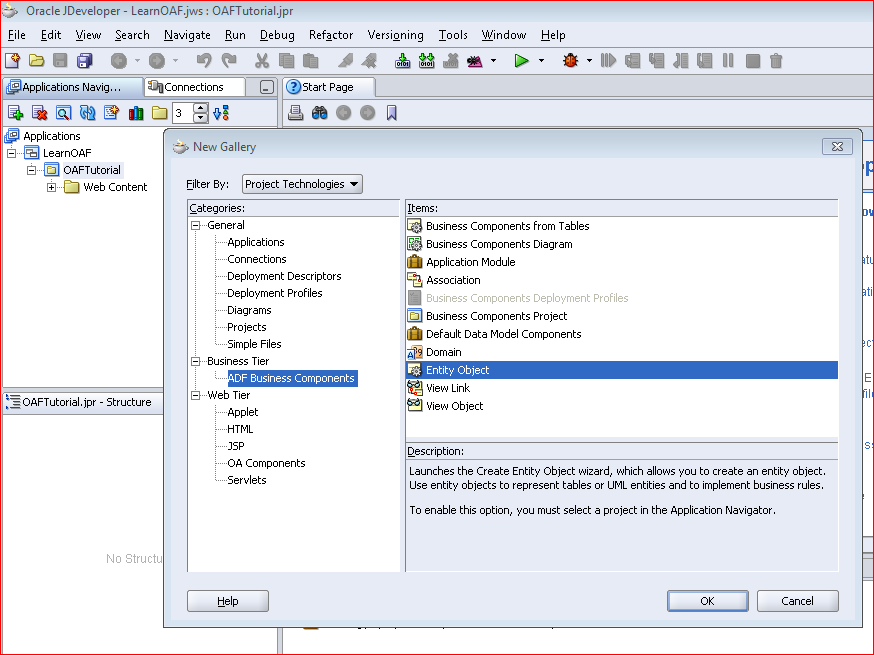
Entity Object
- Right Click on Project to select New
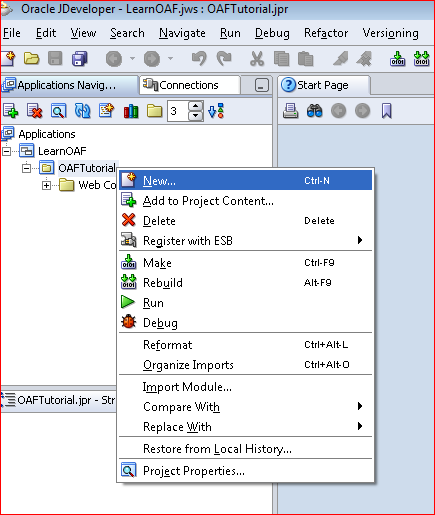
- Select Entity Object.
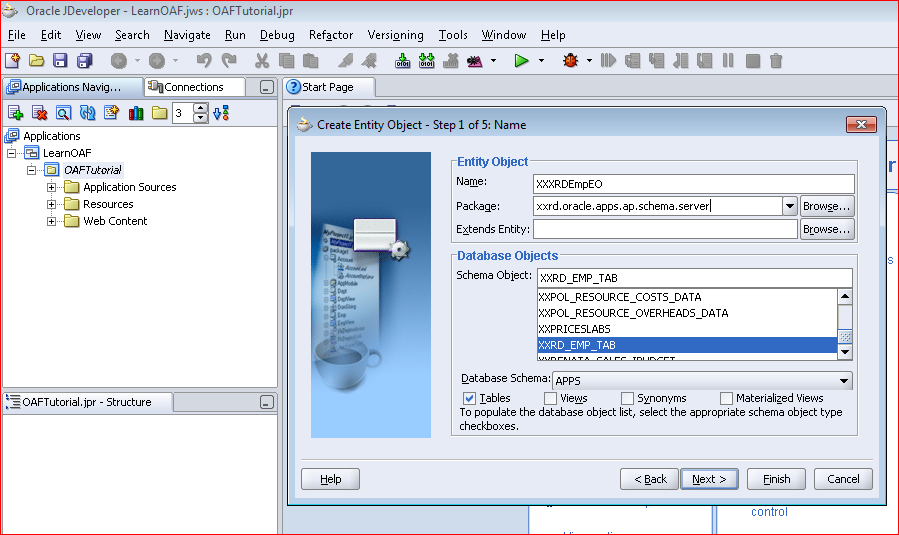
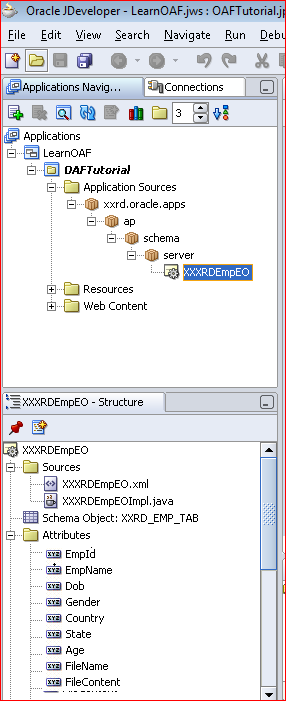
- Enter the Entity Object Name as XXRDEmpEO and Package as xxrd.oracle.apps.ap.schema.server. Select database table XXRD_EMP_TAB. Click Next.
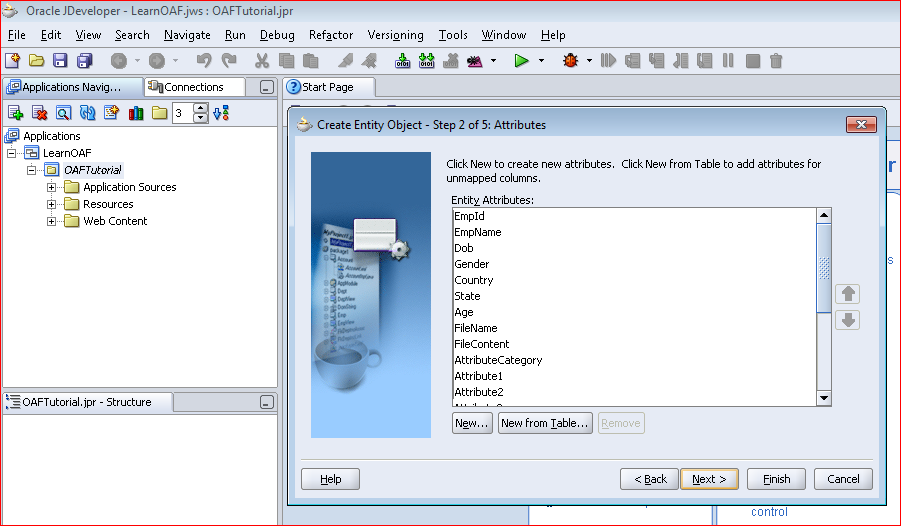
- Click Next without changing anything.
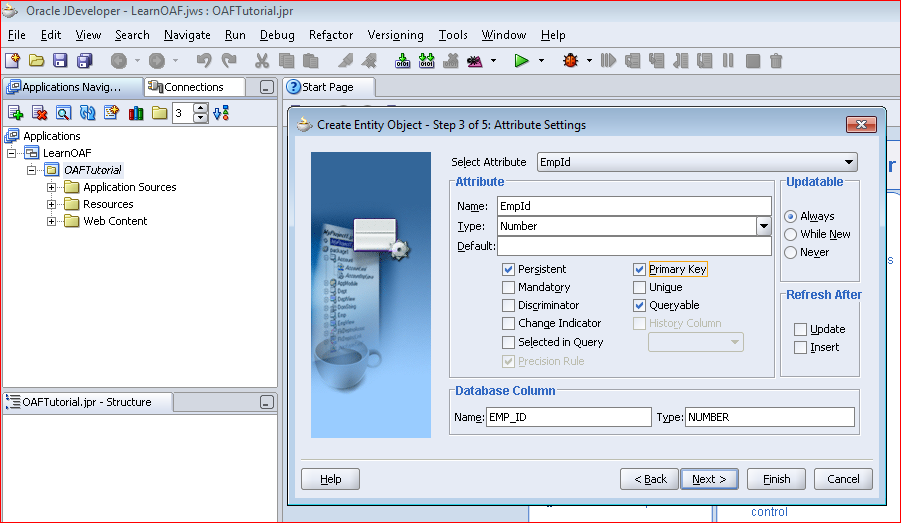
- Set EmpId as Primary Key and Click Next
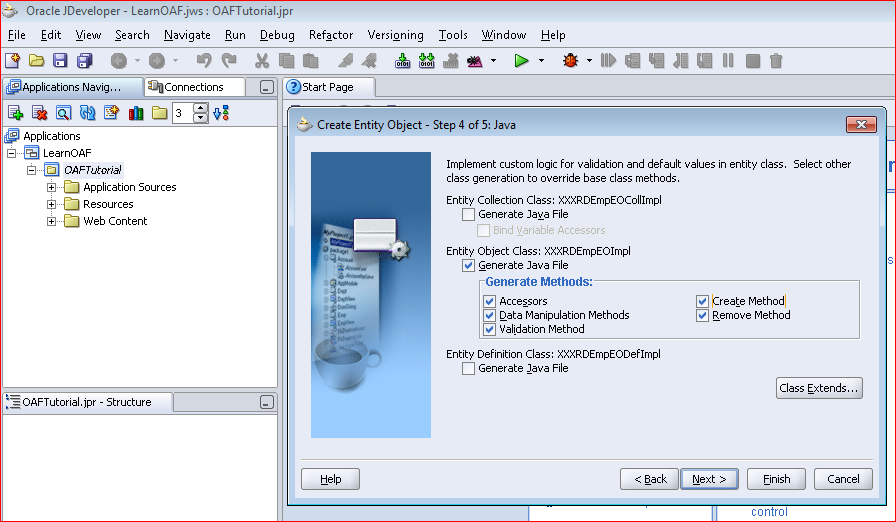
- Check all methods under Generate Methods of XXRDEmpEOImpl
- Click Finish
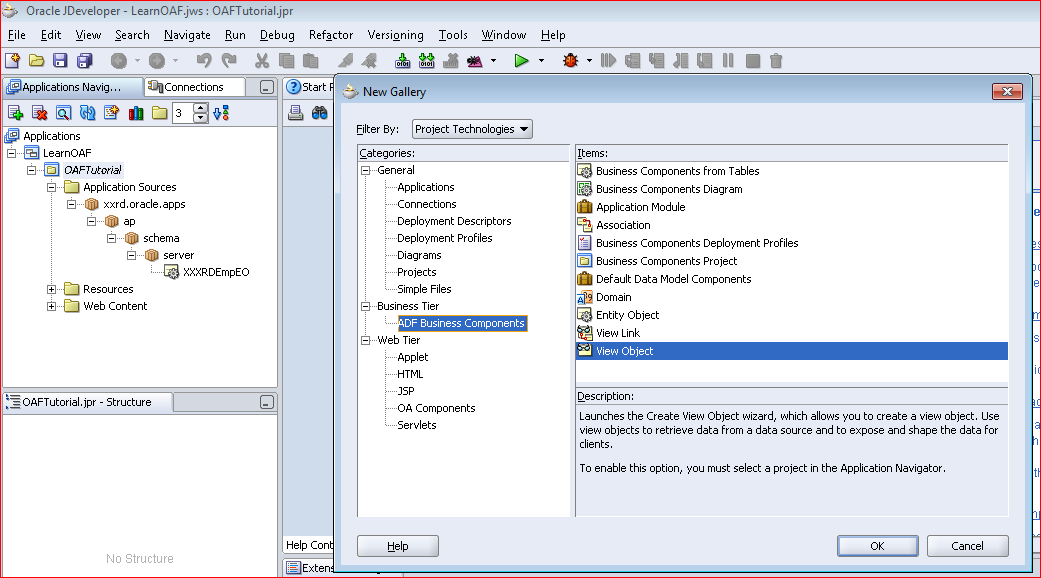
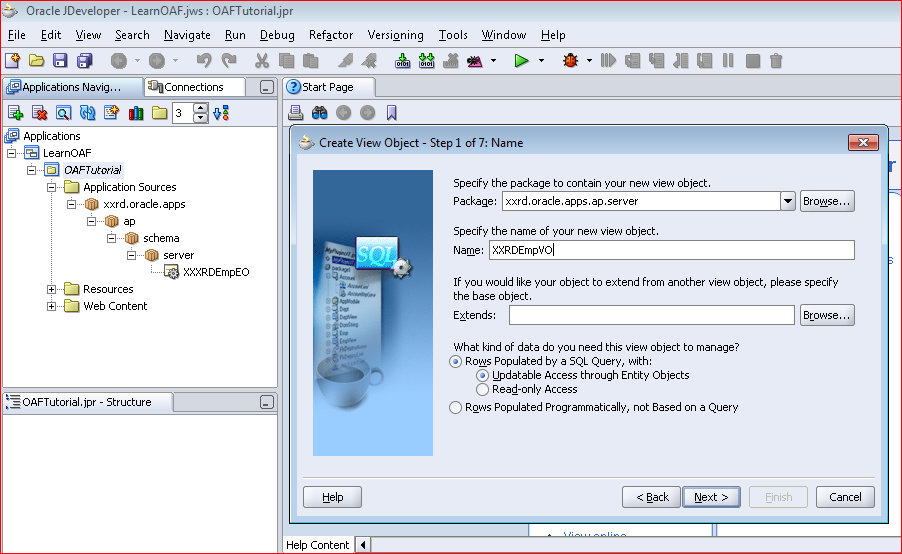
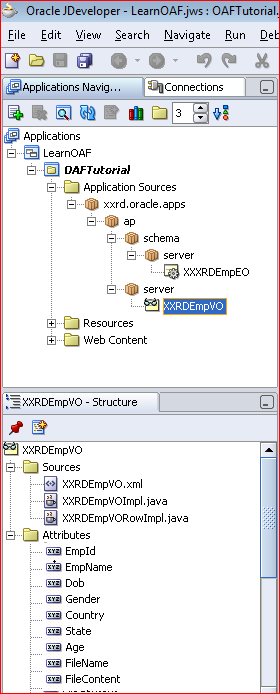
View Object
We are going to create EO based VO now.
- Right Click to select View Object.
- Enter VO Name as XXRDEmpVO and Package as xxrd.oracle.apps.ap.server. And as it is EO based VO, so Updatable Access through Entity Objects.
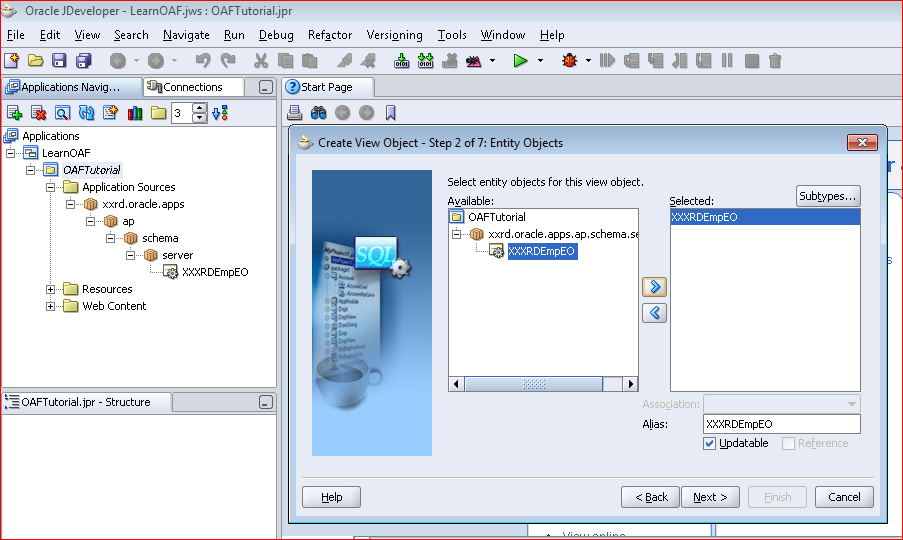
- Select the Entity Object by moving from left to right. Click Next
- Select all columns. Click Next.

- Click Next.

- Click Next.
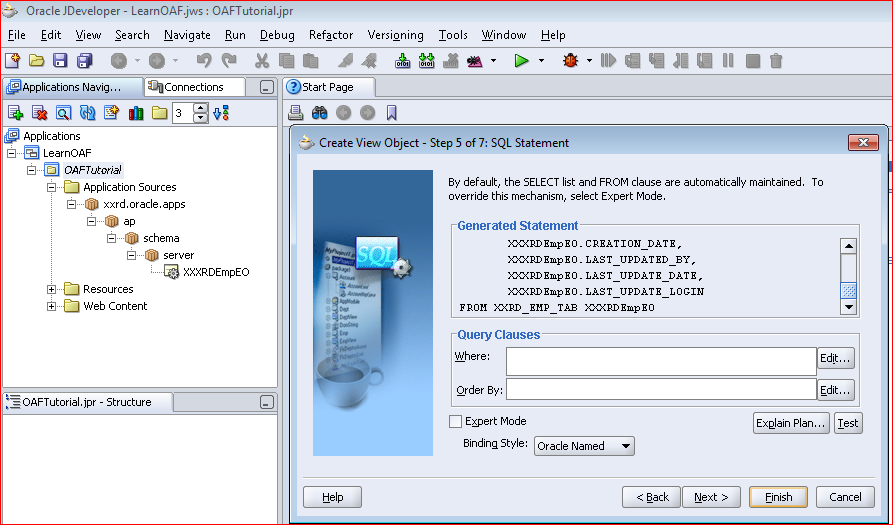
- Check option to GenerateA�XXRDEmpVOImpl and XXRDEmpVORowImpl class

- Click Finish.
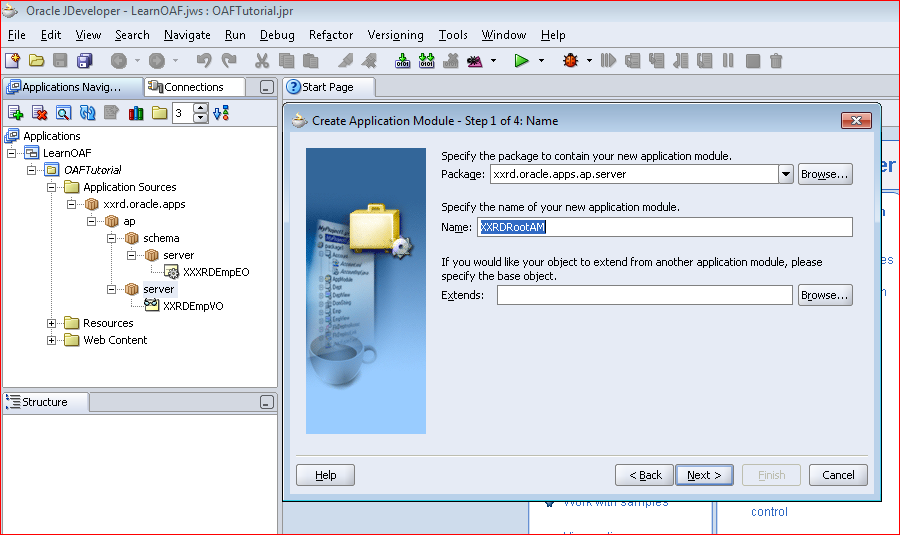
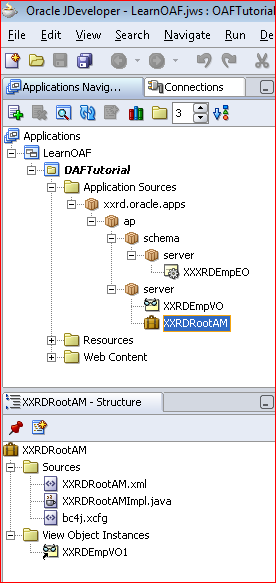
Application Module
- Right Click to select Application Module.
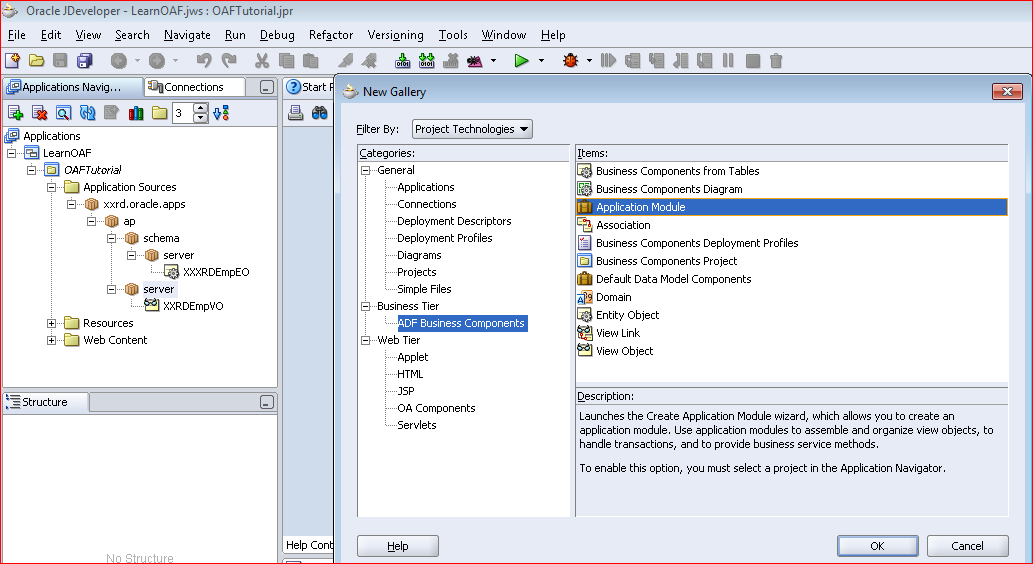
- Enter AM Name as XXRDRootAM and Package as xxrd.oracle.apps.ap.server. Click Next.
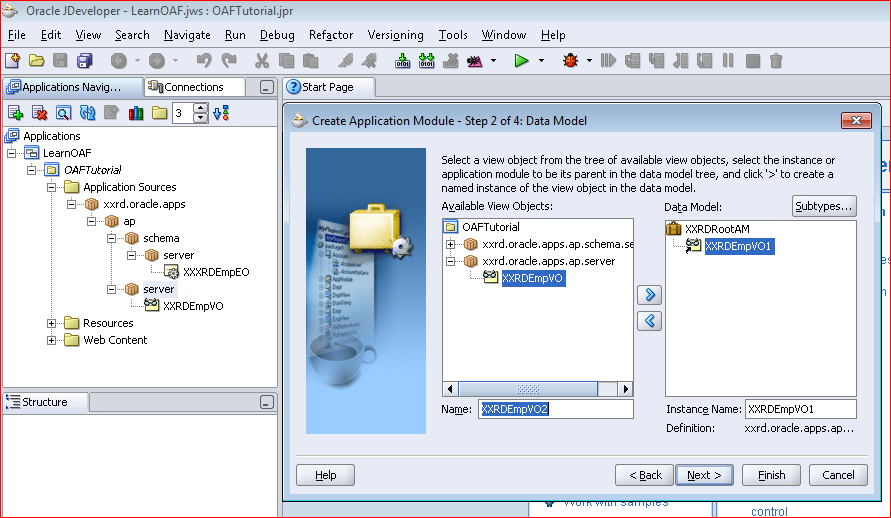
- Attach VO instance, here XXRDEmpVO1. Click Next.
- Click Next.

- Check option to generate XXRDRootAMImpl class.
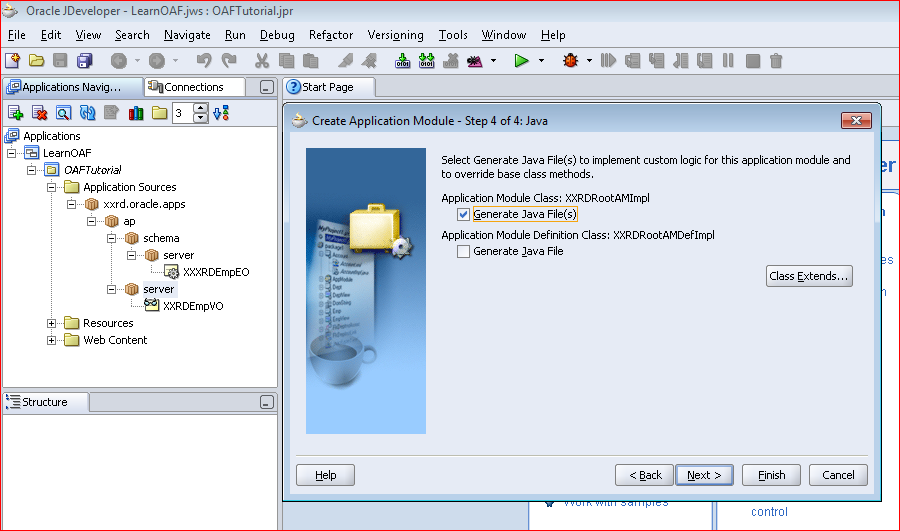
- Click Finish.
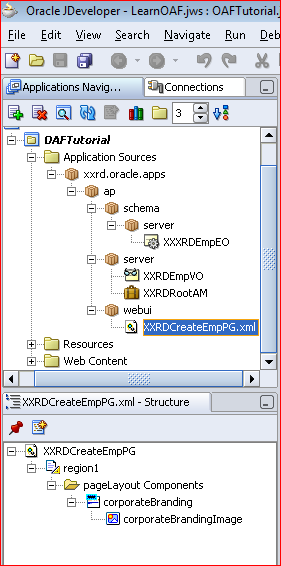
Page
- Right Click > New > OA Components > Page

- Enter Page Name as XXRDCreateEmpPG and Package as xxrd.oracle.apps.ap.webui
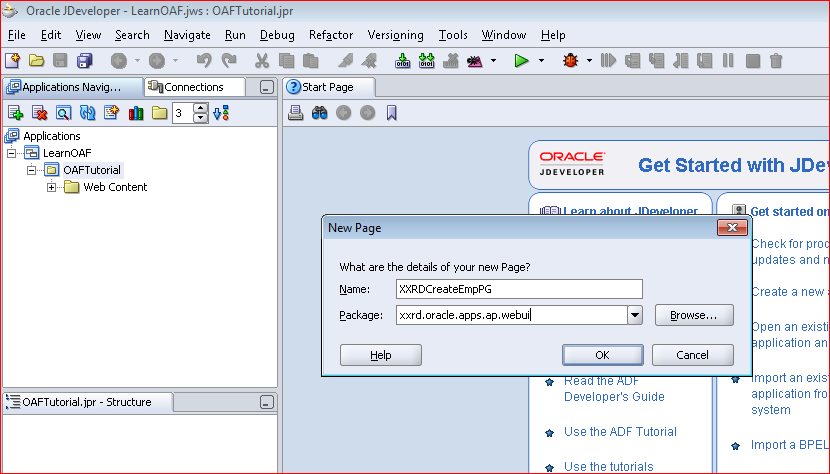
- Click OK
- Change the following:
ID: MainRN
Window Title: Create Employee Page
Title: Create Employee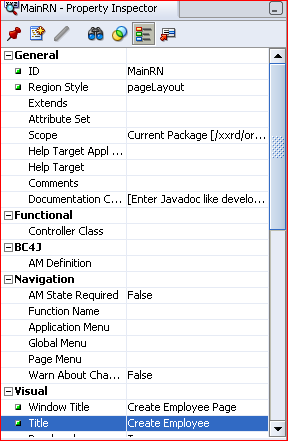
- Now browse to attach AM.
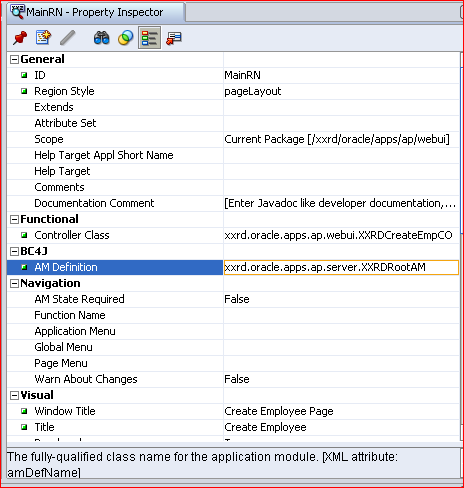
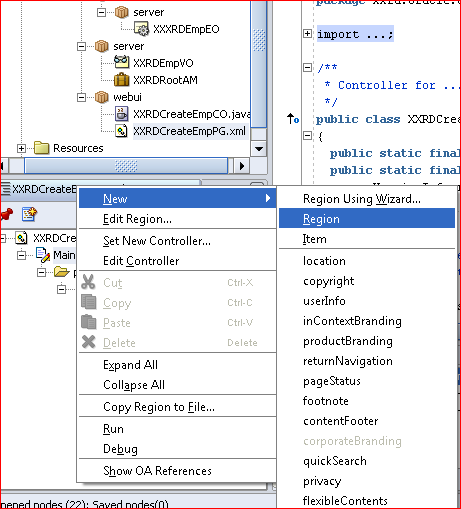
- Right Click on MainRN to create another region.
- Change Region Properties like
ID:A�CreateRN
Region Style: messageComponentLayout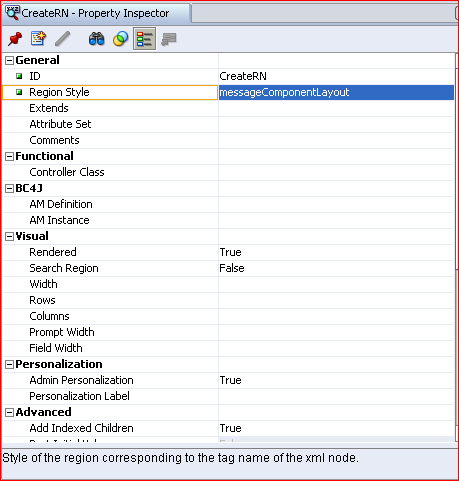
- Right Click on CreateRN to add a messageTextInput
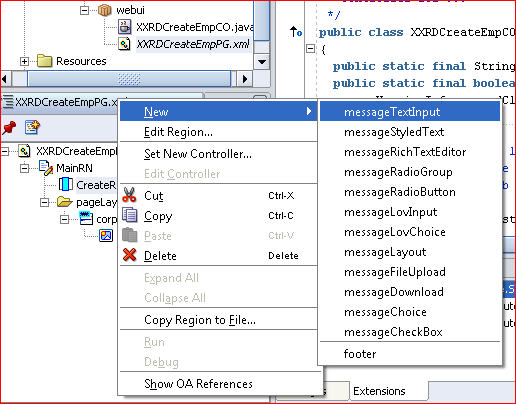
- Update following properties:
ID: EmpName
View Instance: XXRDEmpVO1
View Attribute EmpName
Prompt: Employee Name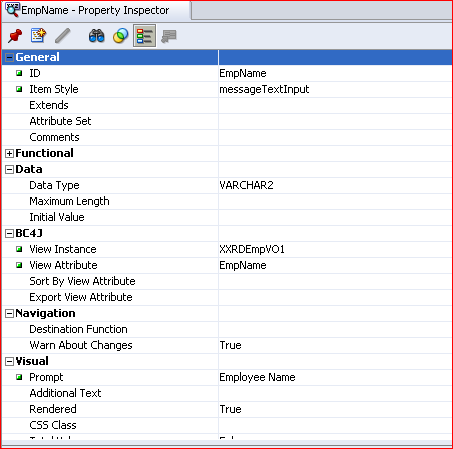
- Create another messageTextInput.
ID: EmpDOB
Data Type:
View Instance: XXRDEmpVO1
View Attribute: Dob
Prompt: Date of Birth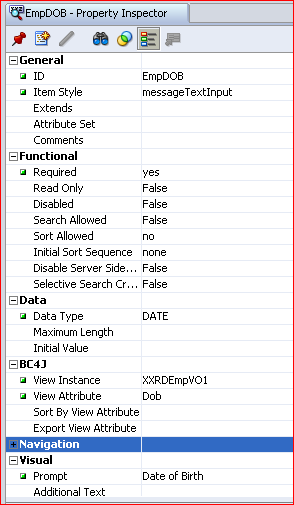
- Add a MessageLayout in order to accommodate Buttons under MessageComponentLayout.
- Create a submit button.
ID: CreateEmpBtn
Item Style: submitButton
Prompt: Create Employee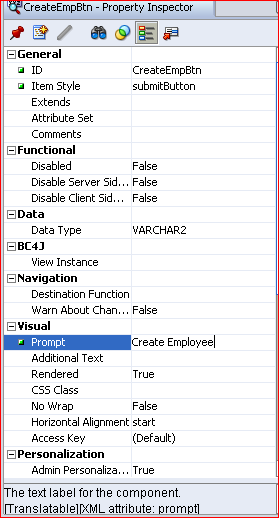
- Similarly create a reset button.
ID: ResetBtn
Item Style: resetButton
Text: Reset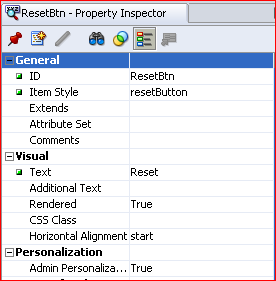
- Page will look like below.
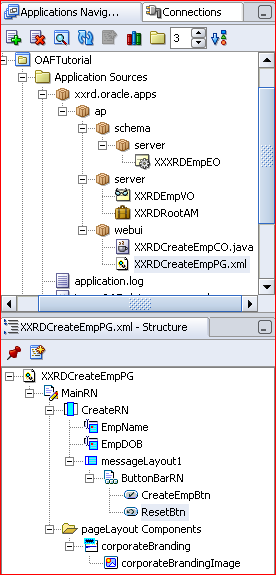
Controller
- Right Click on MainRN to set New Controller. Enter Package: xxrd.oracle.apps.ap.webui Controller Name: XXRDCreateEmpCO

Logic
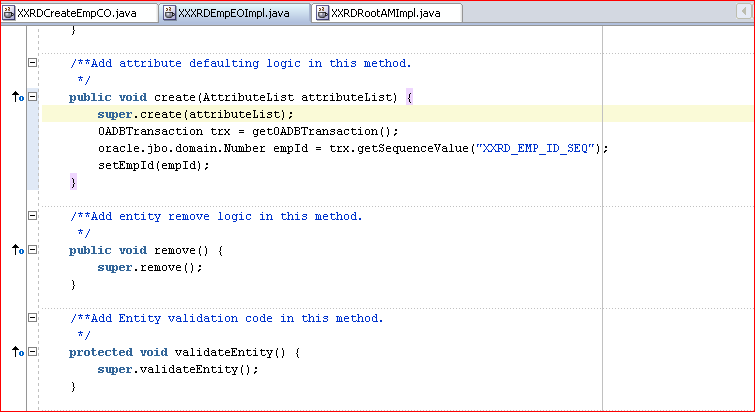
In XXRDEmpEOImpl.java:
Need to write logic in order to generate sequence from Database Sequence within create() method.
public void create(AttributeList attributeList) {
super.create(attributeList);
OADBTransaction trx = getOADBTransaction();
oracle.jbo.domain.Number empId = trx.getSequenceValue(“XXRD_EMP_ID_SEQ”);
setEmpId(empId);
}
In XXRDRootAMImpl.java:
Need to write couple of methods to make data insertion possible.
Method 1:A�createRow() to create a blank row to accommodate data and mark this as Initialized.
public void createRow(){
XXRDEmpVOImpl empVO = getXXRDEmpVO1();
if(!empVO.isPreparedForExecution()){ // Check whether VO is prepared for Execution or not
empVO.executeQuery(); // if Not execute
}
Row row = empVO.createRow(); // Create New Row
empVO.insertRow(row); // Insert the newly created row of Type XXRDEmpVO in the XXRDEmpVO
row.setNewRowState(Row.STATUS_INITIALIZED); // Set the status of the New Row
}
Method 2: commitData() to save the data permanently into a table in database.
public void commiData(){
OADBTransaction trx = getOADBTransaction();
trx.commit();
}

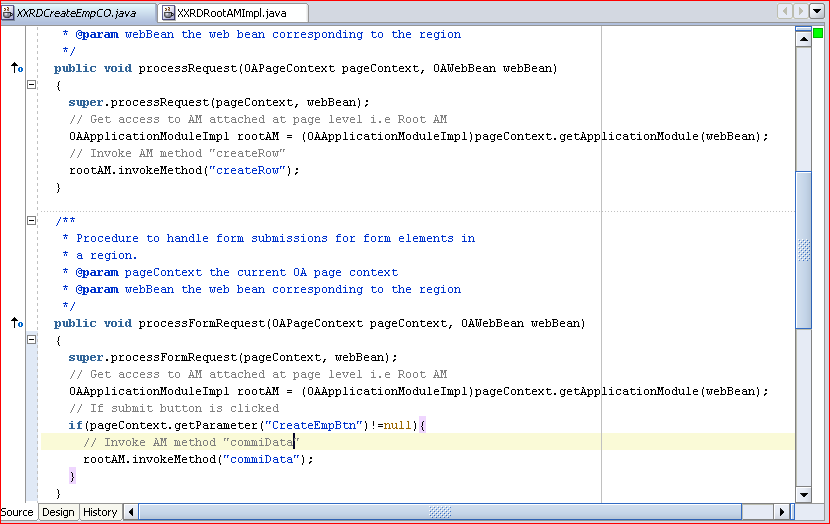
In XXRDCreateEmpCO.java:
code needs to be added in processRequest() and proecessFormRequest(). We will also learn how to invoke method written AM from CO.
public void processRequest(OAPageContext pageContext, OAWebBean webBean)
{
super.processRequest(pageContext, webBean);
// Get access to AM attached at page level i.e Root AM
OAApplicationModuleImpl rootAM = (OAApplicationModuleImpl)pageContext.getApplicationModule(webBean);
// Invoke AM method “createRow”
rootAM.invokeMethod(“createRow”);
}
public void processFormRequest(OAPageContext pageContext, OAWebBean webBean)
{
super.processFormRequest(pageContext, webBean);
// Get access to AM attached at page level i.e Root AM
OAApplicationModuleImpl rootAM = (OAApplicationModuleImpl)pageContext.getApplicationModule(webBean);
// If submit button is clicked
if(pageContext.getParameter(“CreateEmpBtn”)!=null){
// Invoke AM method “commiData”
rootAM.invokeMethod(“commiData”);
}
}
The parameter sign for invokeMethod() is invokeMethod(String methodName), another one , invokeMethod(String methodName, Serializable params[], Class paramClasses[]) . First one is used if there areA�no parameters to pass to AM’s method where as the second one to pass parameters to AM’s method.
Output
The page when launched will look like:
Now query:
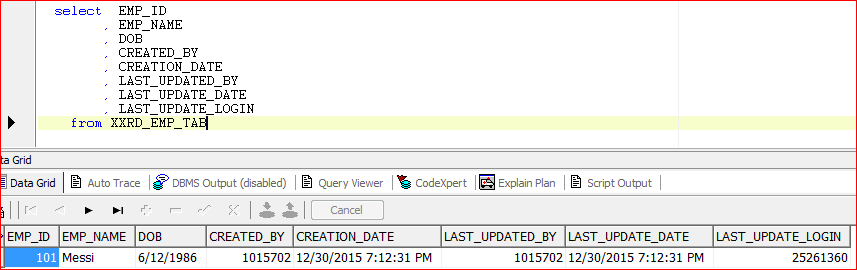
This is how we can insert data in database table through OAF Page. Hope this helps.
 The Humanizer is a platform created by technology domain experts to inspire innovative, hence simple, thoughts for a better social living.


