Here I am going to discuss the next milestone that I have achieved in the world of OAF, Oracle Applications Framework, how to add Delete Button in a Seeded OA Page. I found this very difficult to accomplish as there was no article available over the internet, so thought of sharing if it helps OAF developer to meet similar kind of requirement to be achieved.
Problem Description:
In a seeded OA Page, there is a table which contains multiple records and moreover records can be added manually but there was no way to delete those rows. So the requirement was to add a delete button for every record in that table in the seeded OA Page.
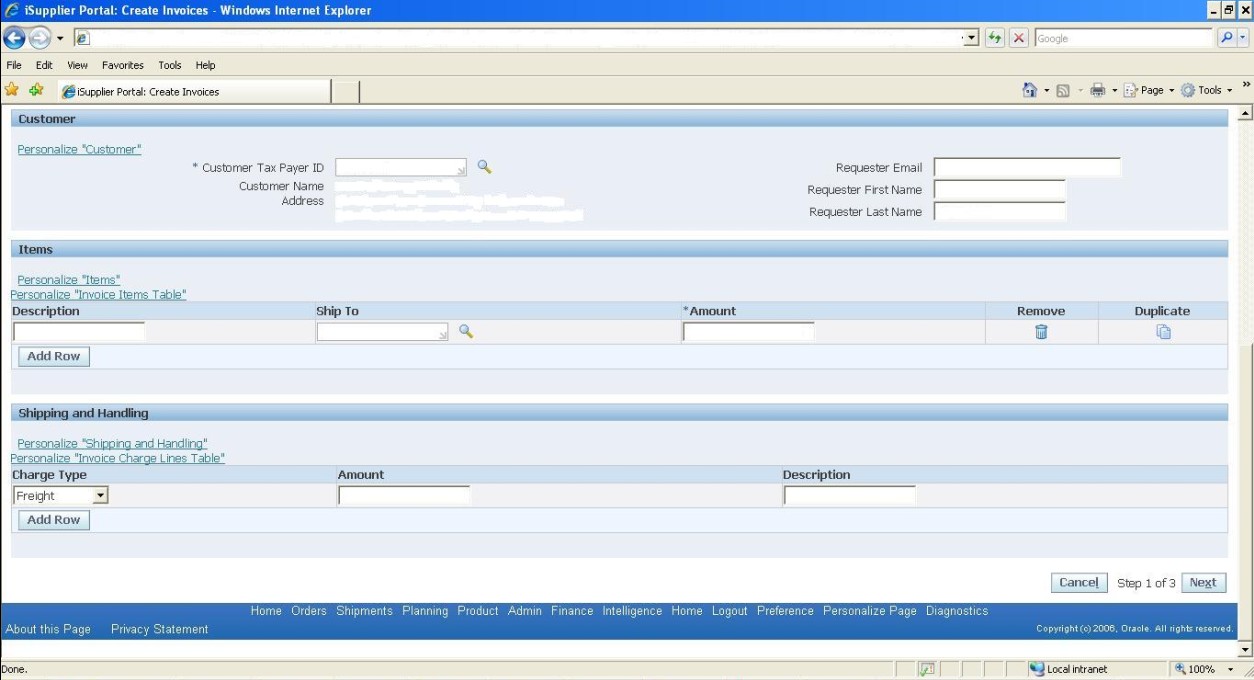
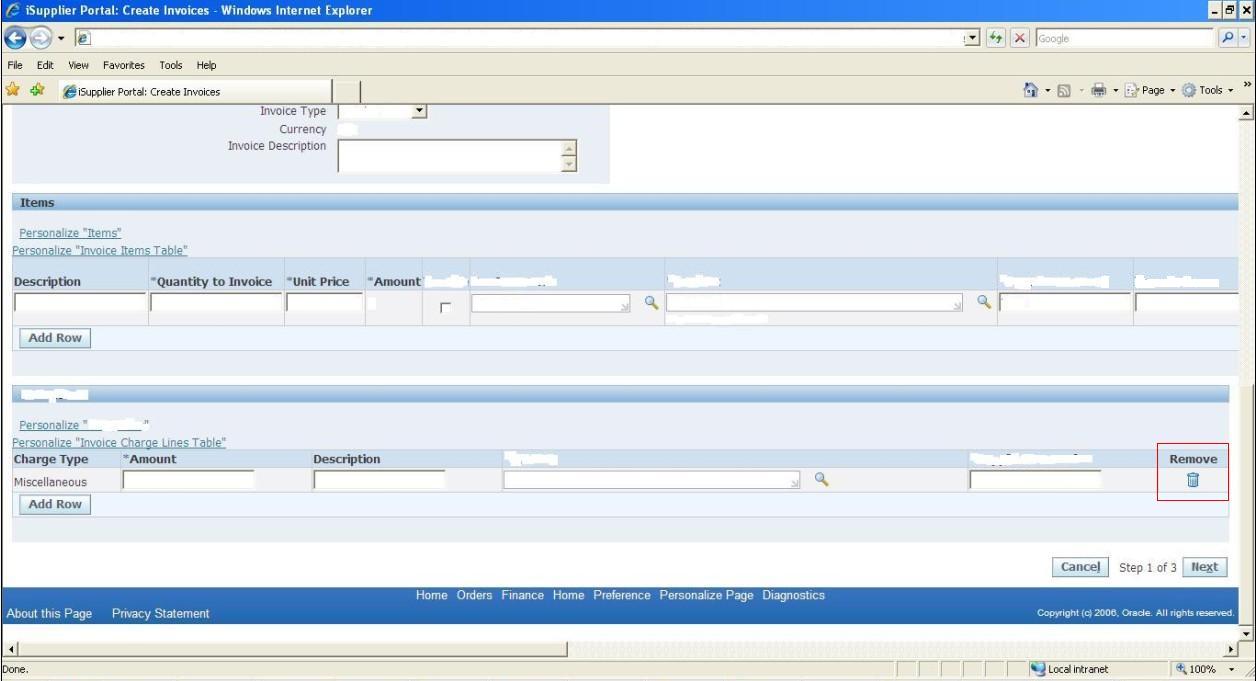
Now I will delve into the detail of problem description with some screen shots to give a clear picture:
Just a have look at the table, Invoice Charge Line table under “Shipping and Handling” section of the OA page, it contains three columns Charge Type, Amount, Description but there is no delete button to delete the entire row if the concerned row is not required. So I have got a requirement to add Delete button for each row.
Now, if you see the Delete button is added for each row in Invoice Charge Line Table under “Shipping and Handling” of the OA page.
Solution Approach:
Here is the high level solution design approach with step details:
- Add a Delete Button Image using OA Page Personalization.
- Extend the Page’s Controller to do the following:
- Give unique id to each row so that when delete button is clicked the correct concerned row gets deleted.
- Add fire-action to the Delete Button image as soon as page loads.
- Delete the concerned row physically from database.
Solution:
At the very first step a delete button image should be added for each row in the table. Here is the details how a delete button image can be added to the table:
- Navigation: Functional Administrator > Personalization > Application Catalog
- Enter, Document Name: <Page Name with full specified path>, Let’s say PG1
- Click on Personalization (Pencil) icon
- Site Include: Checked
- Click on GO.
- Find the table region as mentioned below in tabular format:
Page Region PG1 Header: Shipping and Handling > Table: Charge Lines Table - Click on Create Item icon and enter the following details in order to add the delete button image to the table.
Property Value Level Site Item Style Image ID XX_DEDUCTION_LINE_DELETE_IMG Additional Text Remove Button Admin Personalization True Attribute Set CSS Class Comments Remove Button Data Type VARCHAR2 Destination Function Destination URI Disable Server Side Validation false Export View Attribute Extends Height Image URI deleteicon_enabled.gif Initial Sort Sequence None No Wrap false Popup Enabled false Popup ID Popup Render Event onClick Prompt Remove Rendered True Scope Sort Allowed No Sort By View Attribute User Personalization False View Attribute View Instance Warn About Changes False Width
Next, the controller of this page needs to be extended to write logic behind the image to actually delete the row once the delete icon is clicked.
- Add a transient View Object attribute,say A�”XXLineNumbe”A�to the View Object attached to the table, Invoice Charge Lines Table. Lets say the view object name is “ApInvoiceChargeLinesVO”. The idea behind adding a transient attribute is to assign some unique id to each row of the table so that the rows can be identified uniquely. Here is the code snippet how to add transient attribute in a view object dynamically:
// Method to dynamically add Transient Attribute Charge Line VO
public void addTransAttrToChargeLineVo(OAPageContext pageContext,OAWebBean webBean)
{
if(pageContext.isLoggingEnabled(2))
pageContext.writeDiagnostics(this,”XXUnmatchedInvPGCO:addTransAttrToChargeLineVo:Enter”,2);
OAViewObjectImpl apInvoiceChargeLinesVOImpl = rootAM.getApInvoiceChargeLinesVO();if(apInvoiceChargeLinesVOImpl !=null)
{
try
{
String voAttribute = apInvoiceChargeLinesVOImpl.findAttributeDef(“XXLineNumber”).toString();
if(pageContext.isLoggingEnabled(2))
pageContext.writeDiagnostics(this,”XXUnmatchedInvPGCO:addTransAttrToChargeLineVo:voAttribute=”+voAttribute,2);
}
catch(Exception e)
{
apInvoiceChargeLinesVOImpl.addDynamicAttribute(“XXLineNumber”);
if(pageContext.isLoggingEnabled(2))
pageContext.writeDiagnostics(this,”XXUnmatchedInvPGCO:addTransAttrToChargeLineVo:catch-block:vo attribute added”,2);
}
}if(pageContext.isLoggingEnabled(2))
pageContext.writeDiagnostics(this,”XXUnmatchedInvPGCO:addTransAttrToChargeLineVo:exit”,2);
} - Next some unique number has to be assigned to the transient attribute followed by attaching Fireaction to each delete button image. Here is the code snippet:
// Method to add Fireaction to Delete Button
public void addFireActionToDeleteButton(OAPageContext pageContext,OAWebBean webBean, ApInvoiceChargeLinesVORowImpl apInvoiceChargeLinesVORowImpl)
{
if(pageContext.isLoggingEnabled(2))
pageContext.writeDiagnostics(this,”XXUnmatchedInvPGCO:addFireActionToDeleteButton:Enter:Line Number=”+apInvoiceChargeLinesVORowImpl.getLineNumber(),2);apInvoiceChargeLinesVORowImpl.setAttribute(“XXLineNumber”,apInvoiceChargeLinesVORowImpl.getLineNumber());// Get Charge Line Table Bean and Image Bean
OATableBean chargeLineTable = (OATableBean)webBean.findChildRecursive(“ChargeLinesTable”);
OAImageBean deleteImageBean = (OAImageBean)chargeLineTable.findChildRecursive(“XX_DEDUCTION_LINE_DELETE_IMG”);// Attach Fireaction
Hashtable params = new Hashtable (1);
params.put (“XX_ACTION”, pageContext.getRootRegionCode());
Hashtable paramsWithBinds = new Hashtable(1);
paramsWithBinds.put (“XX_PRIMARY”,new OADataBoundValueFireActionURL((OAWebBeanData)deleteImageBean,”{$LineNumber}”));
deleteImageBean.getHelper().setFireActionForSubmit(deleteImageBean,”deletechargeLine”,params,paramsWithBinds,true,true);if(pageContext.isLoggingEnabled(2))
pageContext.writeDiagnostics(this,”XXUnmatchedInvPGCO:addFireActionToDeleteButton:XX_ACTION=”+pageContext.getRootRegionCode(),2);if(pageContext.isLoggingEnabled(2))
pageContext.writeDiagnostics(this,”XXUnmatchedInvPGCO:addFireActionToDeleteButton:Exit”,2);
}Please noteA�this methods should be called from ProcessRequest() of the controller, that does mean as soon as page loads, transient attribute should get added to the view object. If the delete button exists that does mean if Invoice Charge Line is created(by clicking Add Rows Button,where fireaction is attached for the first time,discussed below) and then user navigated to any other page and again comes back to this page, then fireaction attached to the delete button needs to be retained. Here is the code snippet for the same:public void processRequest(OAPageContext pageContext, OAWebBean webBean)
{
super.processRequest(pageContext, webBean);
InvoiceRequestAMImpl rootAM = (InvoiceRequestAMImpl)pageContext.getApplicationModule(webBean);
addTransAttrToChargeLineVo(pageContext,webBean);
OAViewObjectImpl apInvoiceChargeLinesVOImpl = rootAM.getApInvoiceChargeLinesVO();
ApInvoiceChargeLinesVORowImpl apInvoiceChargeLinesVORowImpl = null;
if(apInvoiceChargeLinesVOImpl!=null)
{
try
{
for (apInvoiceChargeLinesVORowImpl = (ApInvoiceChargeLinesVORowImpl)apInvoiceChargeLinesVOImpl.first(); apInvoiceChargeLinesVORowImpl != null; apInvoiceChargeLinesVORowImpl = (ApInvoiceChargeLinesVORowImpl)apInvoiceChargeLinesVOImpl.next())
{
// call addFireActionToDeleteButton() method to retain fireaction attached earlier
addFireActionToDeleteButton(pageContext,webBean,apInvoiceChargeLinesVORowImpl);
}
}
catch(Exception exception)
{
if (pageContext.isLoggingEnabled(2))
pageContext.writeDiagnostics(this,”XXUnmatchedInvPGCO:processRequest:Problem in setting Fire Action:exception=”+exception,2);
}
}
}For attaching fireaction to the delete button image for the first time when Invoice Charge Line Row is created by clicking “Add Rows” button, at first transient attribute has to be initialized with some unique number for each row thenA�fire action is set for the delete button image.A�For that below code needs to be written in processFormRequest() when Add Rows Button event is fired:public void processFormRequest(OAPageContext pageContext, OAWebBean webBean)
{
super.processFormRequest(pageContext, webBean);//Get an instance of the Charge Line Table
OATableBean chargeLineTableBean = (OATableBean)webBean.findChildRecursive(“ChargeLinesTable”);// If AddRows is clicked for Charge Lines
if ((chargeLineTableBean != null) && (chargeLineTableBean.getName(pageContext).equals(pageContext.getParameter(“source”))) && (“addRows”.equals(pageContext.getParameter(“event”))))
{
for (apInvoiceChargeLinesVORowImpl = (ApInvoiceChargeLinesVORowImpl)apInvoiceChargeLinesVOImpl.first(); apInvoiceChargeLinesVORowImpl != null; apInvoiceChargeLinesVORowImpl = (ApInvoiceChargeLinesVORowImpl)apInvoiceChargeLinesVOImpl.next()){
// call addFireActionToDeleteButton() method
addFireActionToDeleteButton(pageContext,webBean,apInvoiceChargeLinesVORowImpl);
}
}
} - Now physical deletion of the row should happen once delete button is clicked. So first it is required to identify which row user wants to delete, get the unique number and delete the row. Here is the code:// Method to perform delete action when clicked on delete image attached to every Charge Line
public void performDeleteAction(OAPageContext pageContext,InvoiceRequestAMImpl am)
{
if(pageContext.isLoggingEnabled(2))
pageContext.writeDiagnostics(this,”XXUnmatchedInvPGCO:performDeleteAction:Enter”,2);OAViewObjectImpl apInvoiceChargeLinesVOImpl = am.getApInvoiceChargeLinesVO();
OADBTransaction oadbTransaction = am.getOADBTransaction();if(pageContext.isLoggingEnabled(2))
pageContext.writeDiagnostics(this,”XXUnmatchedInvPGCO:performDeleteAction:event=”+pageContext.getParameter(“XX_ACTION”)+”:Line Number=”+pageContext.getParameter(“XX_PRIMARY”)+”:Event Param=”+pageContext.getParameter(EVENT_PARAM),2);Row row[] = apInvoiceChargeLinesVOImpl.getAllRowsInRange();
for (int index=0;index<row.length;index++)
{
if (“deletechargeLine”.equals(pageContext.getParameter(EVENT_PARAM)))
{
if(pageContext.isLoggingEnabled(2))
pageContext.writeDiagnostics(this,”XXUnmatchedInvPGCO:performDeleteAction:Row Line Number=”+row[index].getAttribute(“XXLineNumber”)+”:PageContext Line Number=”+pageContext.getParameter(“XX_PRIMARY”),2);if(row[index].getAttribute(“XXLineNumber”).toString().equals(pageContext.getParameter(“XX_PRIMARY”)))
{
if(pageContext.isLoggingEnabled(2))
pageContext.writeDiagnostics(this,”XXUnmatchedInvPGCO:performDeleteAction:Deleted Line Number=”+row[index].getAttribute(“XXLineNumber”),1);
delTaxLines.add(row[index].getAttribute(“XXLineNumber”));
pageContext.putTransactionTransientValue(“XX_CPL_DELETE_TAXLINES_LINES”,delTaxLines);row[index].remove();
oadbTransaction.postChanges();
}
}
}
if(pageContext.isLoggingEnabled(2))
pageContext.writeDiagnostics(this,”XXUnmatchedInvPGCO:performDeleteAction:Exit”,1);
}This method will be invoked from processFormRequest() once the user wants to delete the row:
public void processFormRequest(OAPageContext pageContext, OAWebBean webBean)
{
// If delete action is performed
if(pageContext.getParameter(“XX_ACTION”)!=null)
{
// call performDeleteAction() method
performDeleteAction(pageContext,rootAM);
}
super.processFormRequest(pageContext, webBean);
}Once delete button is clicked, the row will get deleted and user will not find that row too. This was all about adding a delete button with full working functionality in a seeded OA Page
The same code snippet can be referred for how to add fireaction dynamically to an item in OA Page.


 The Humanizer is a platform created by technology domain experts to inspire innovative, hence simple, thoughts for a better social living.


