


Introduction:
JMS (Java Message service) is an application program interface that enables communication between applications. FMW (Oracle Fusion Middleware) supports scalable enterprise messaging system. JMS producer creates JMS messages and JMS consumer consumes JMS messages. JMS interface use Extensible Markup Language (XML) for communication purpose. JMS supports two messaging paradigms a�� queue (point to point) and topic (publish/subscribe).
Queue: In queue messaging system, the messages will be saved in the queue, until the messages are consumed. Once the message is consumed, that will not be available in the queue again for consumption.
Topic: In topic messaging system, the messages will be published by producers and those will be subscribed by consumers. The messages will be available in the topic after consuming by one consumer also. Topic message paradigm is opposite to Queue paradigm.
Configuration of JMS adapter includes 6 major setups a��
- JMS Server a�� JMS server is a container of resources in JMS module. It manages and maintain the persistence and state of messages.
- JMS Module a�� This is a container of JMS resources like connection factory, queue, topic etc.
- Subdeployment a�� Subdeployment is a grouping of targets. It creates connection between JMS server and JMS module
- Connection Factory a�� It enables JMS client to create connection to the JMS destination
- Queue/Topic a�� actual destination of the messages
- Connection Pool a�� Connection pool represents a physical connection to the JMS provider
Configuration of JMS adapter will be cleared from the below diagram.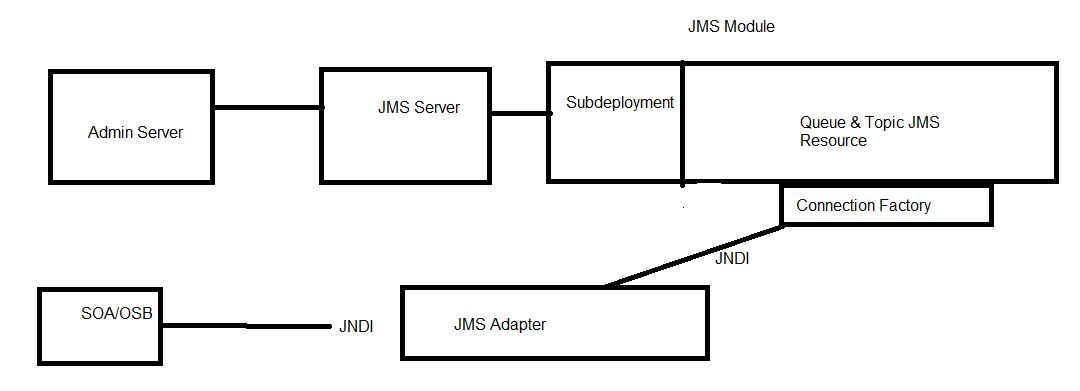
Follow the below steps to configure JMS resources in the weblogic server.
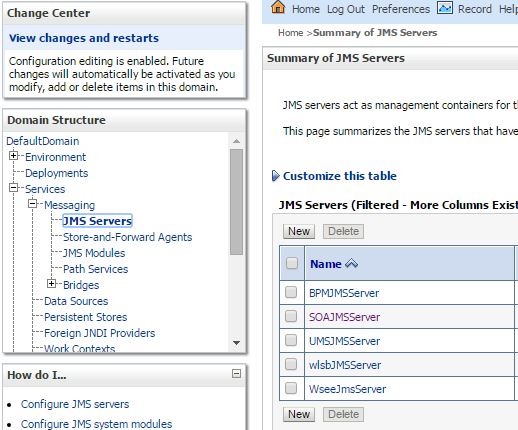
- Navigate to Services -> Messaging -> JMS Servers in the Administration Console. Click on New
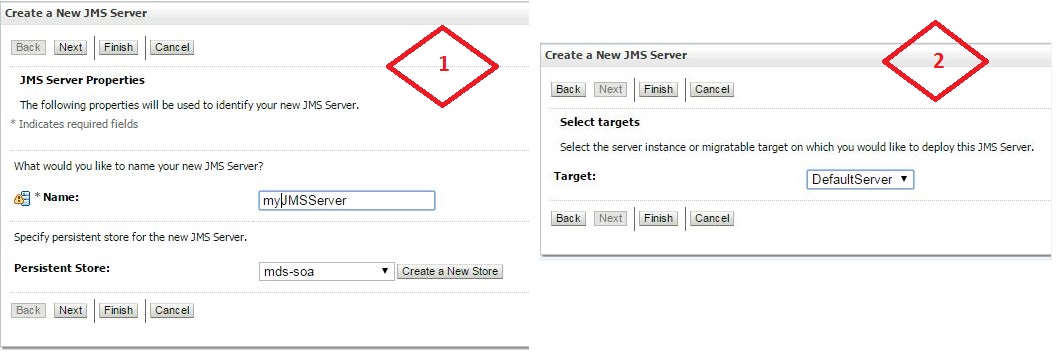
- Enter JMS server name and select DefaultServer as Target in the next window.
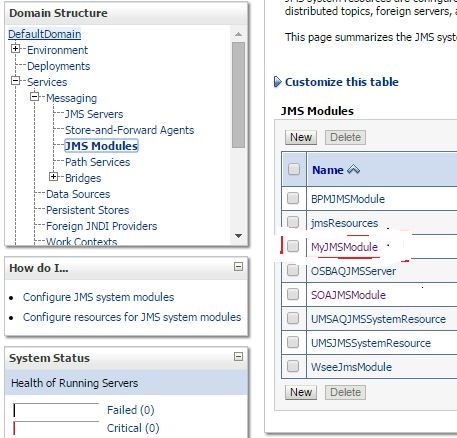
- Create JMS module in the admin server. Navigate to Services -> Messaging -> JMS Modules
- Click on New. Enter JMS module name and select target server in the next window. Click on Finish button
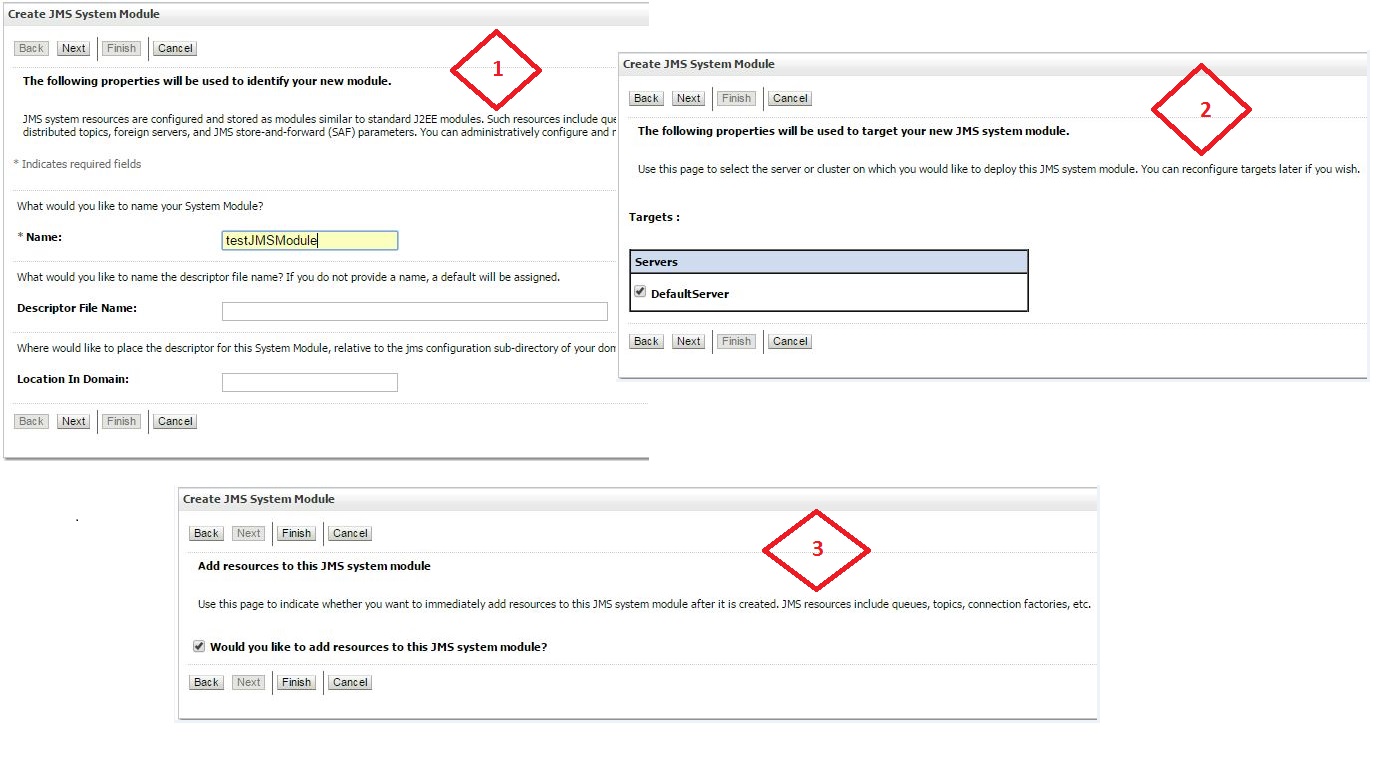
- Open testJMSModule and navigate to Subdeployments Enter subdeployment name
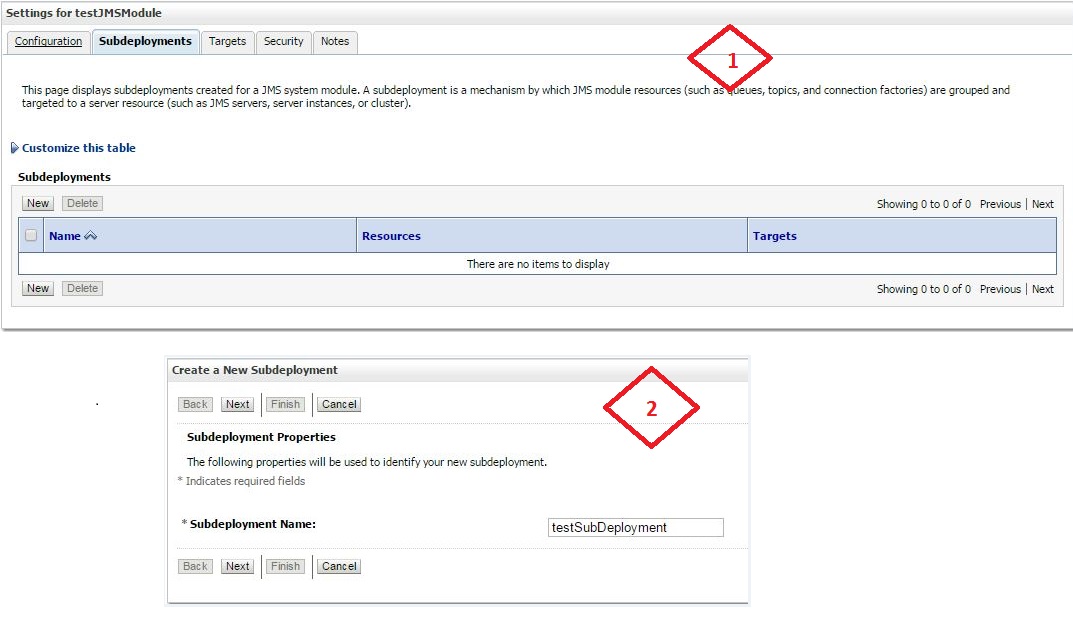
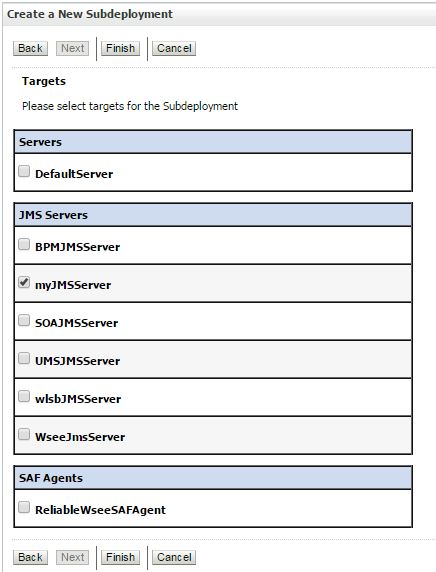
- Click on Next button and select target JMS server
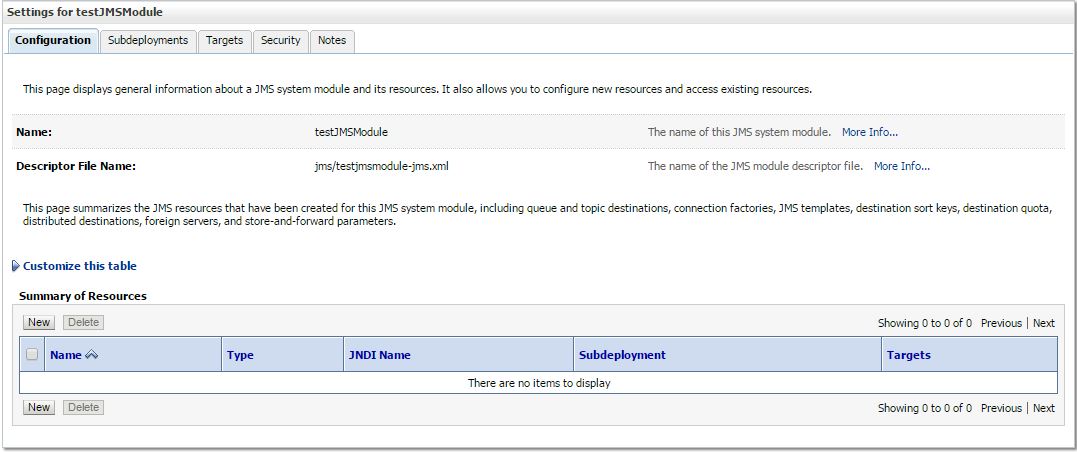
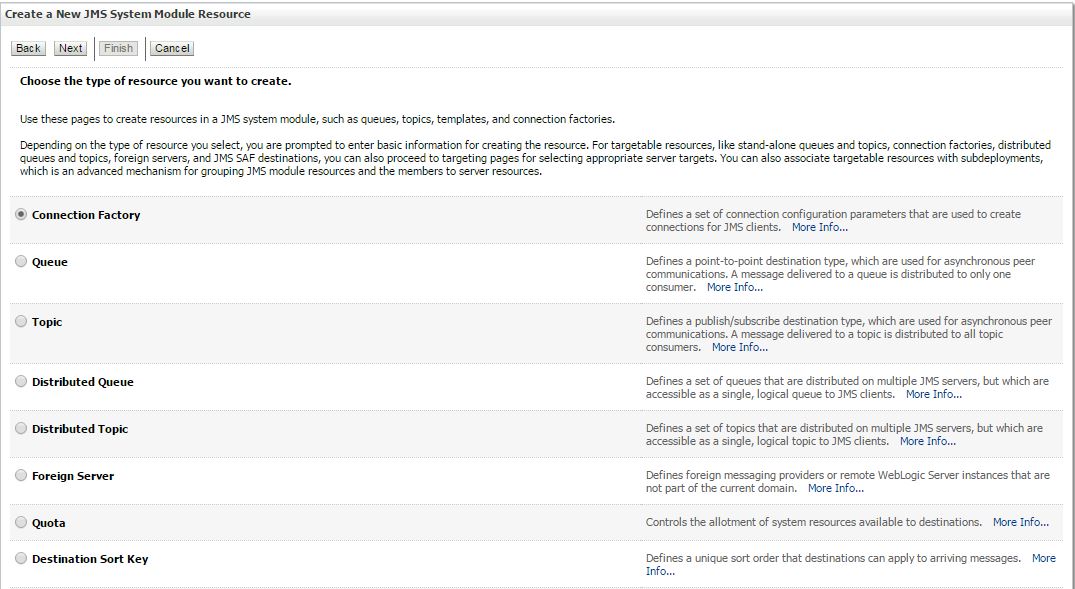
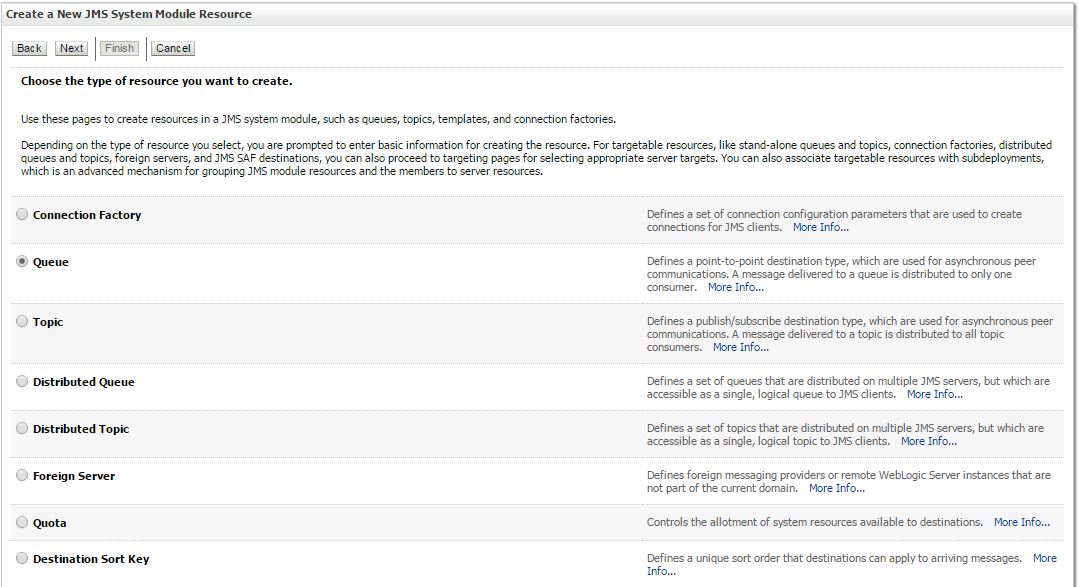
- Navigate to Configuration tab to create Connection Factory and Queue. Click on New
- Select Connection Factory as resource type
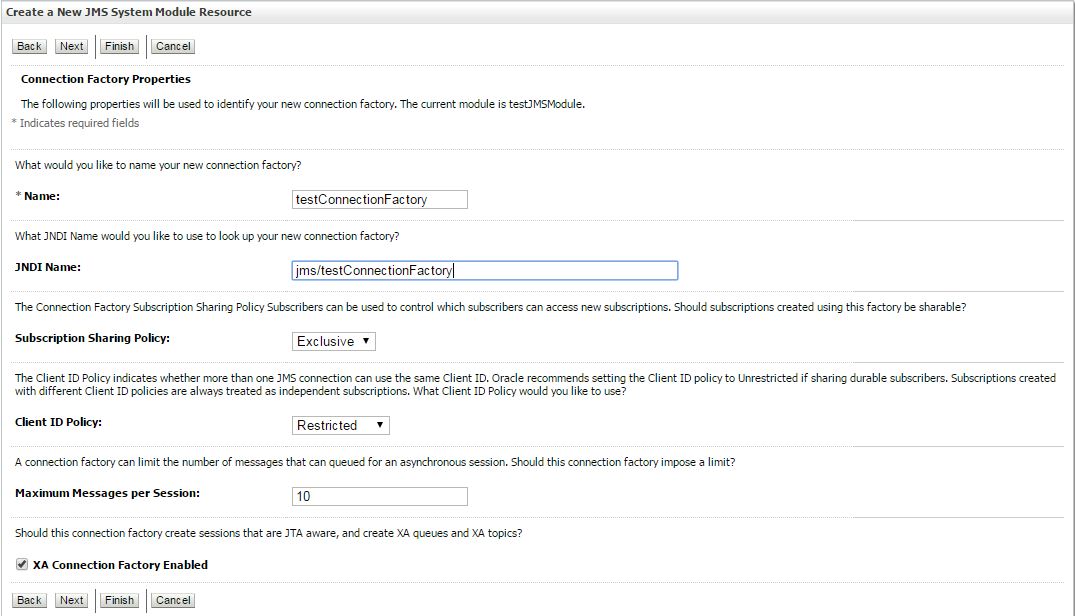
- Enter connection factory name (testConnectionFactory), JNDI connection name of connection factory (jms/ testConnectionFactory) and select XA Connection Factory Enabled. A� A� A� A� A� A� A� A� A� A� A� A� A� A� A� A� A� A� A� A� A� A� A� A� A� A� A� A� A� A� A� A� A� A� A� A� A� A� A� A� A� A� A� A� A� A� A� A� A� A� A� A� A� A� A� A� A� A� A� A� A� A� A� A� A� A� A� A� A� A� A� A� A� A� A� A� A� A� A� A� A� A� A� A� A�JNDI (Java Naming and Directory Interface):The most common use case is to set up a connection pool on a Java EE application server. Any application that’s deployed on that server can gain access to the connections without knowing the details about the connection. A� A� A� A� A� A� A� A� A� A� A� A�XA Transaction:You can access multiple databases in XA Transaction. It has a Transaction Manager.A�But Non XA Transaction does not have these facilities.
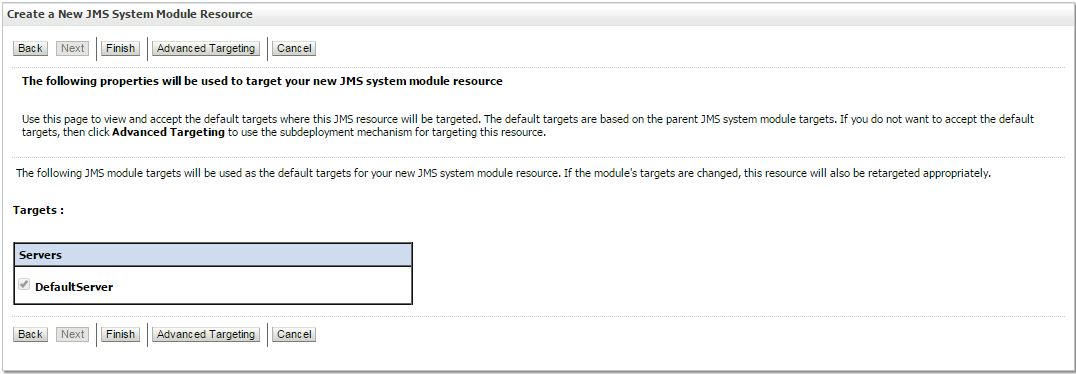
- Click on Next button and select target server.
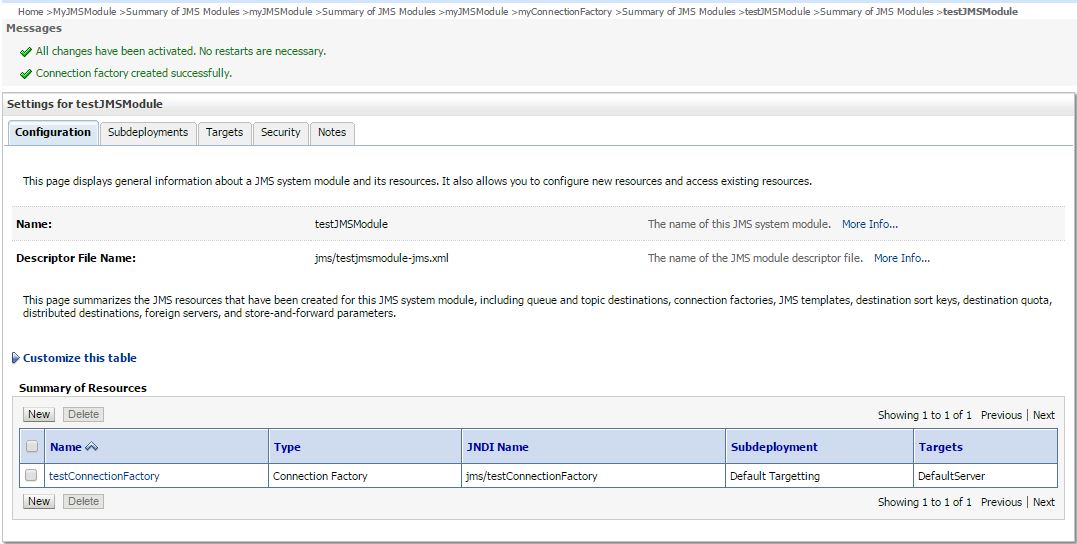
- Click on Finish button. Connection Factory will be created successfully.
- Again click on New button and select Queue as resource type
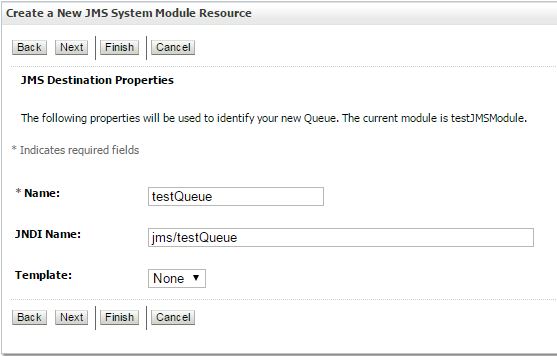
- Enter queue name (testQueue) and JNDI name of queue (jms/testQueue)
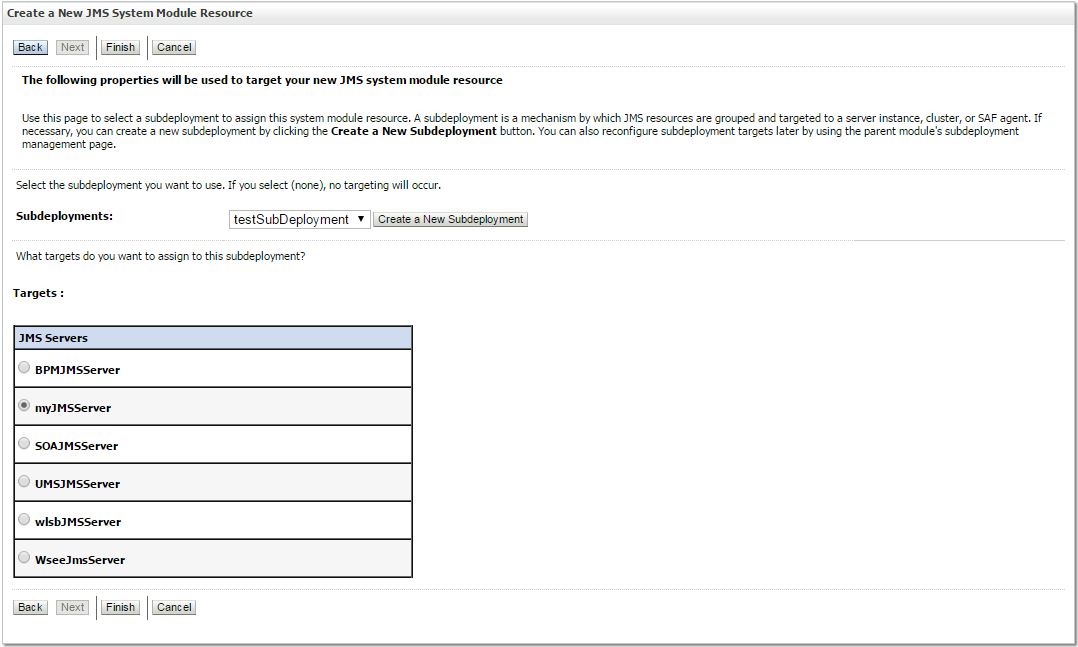
- Click on Next button and select subdeployment from the drop down listA�and target JMS server
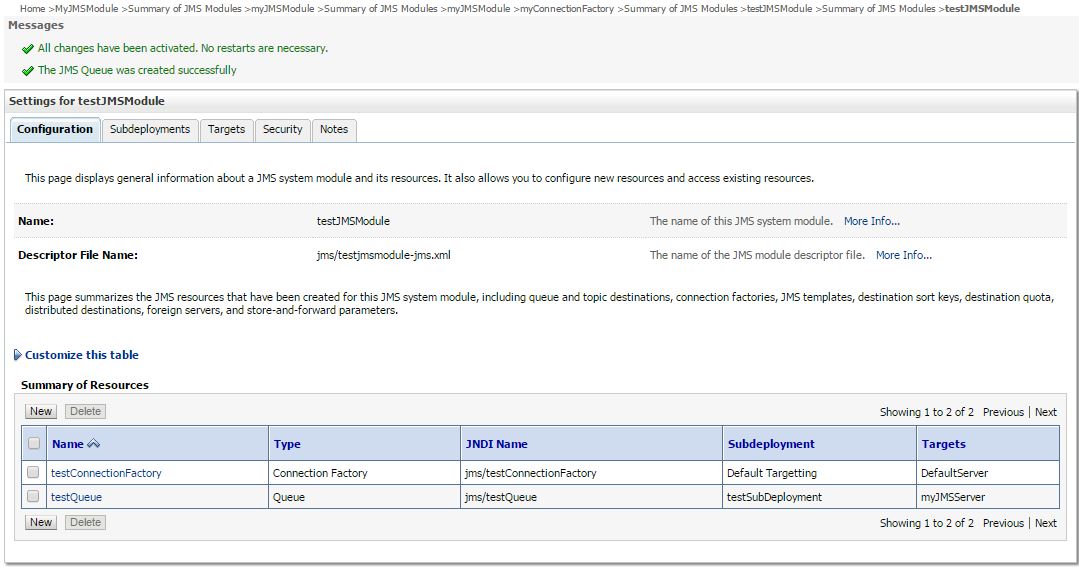
- Queue will be created successfully and successful message will be displayed.
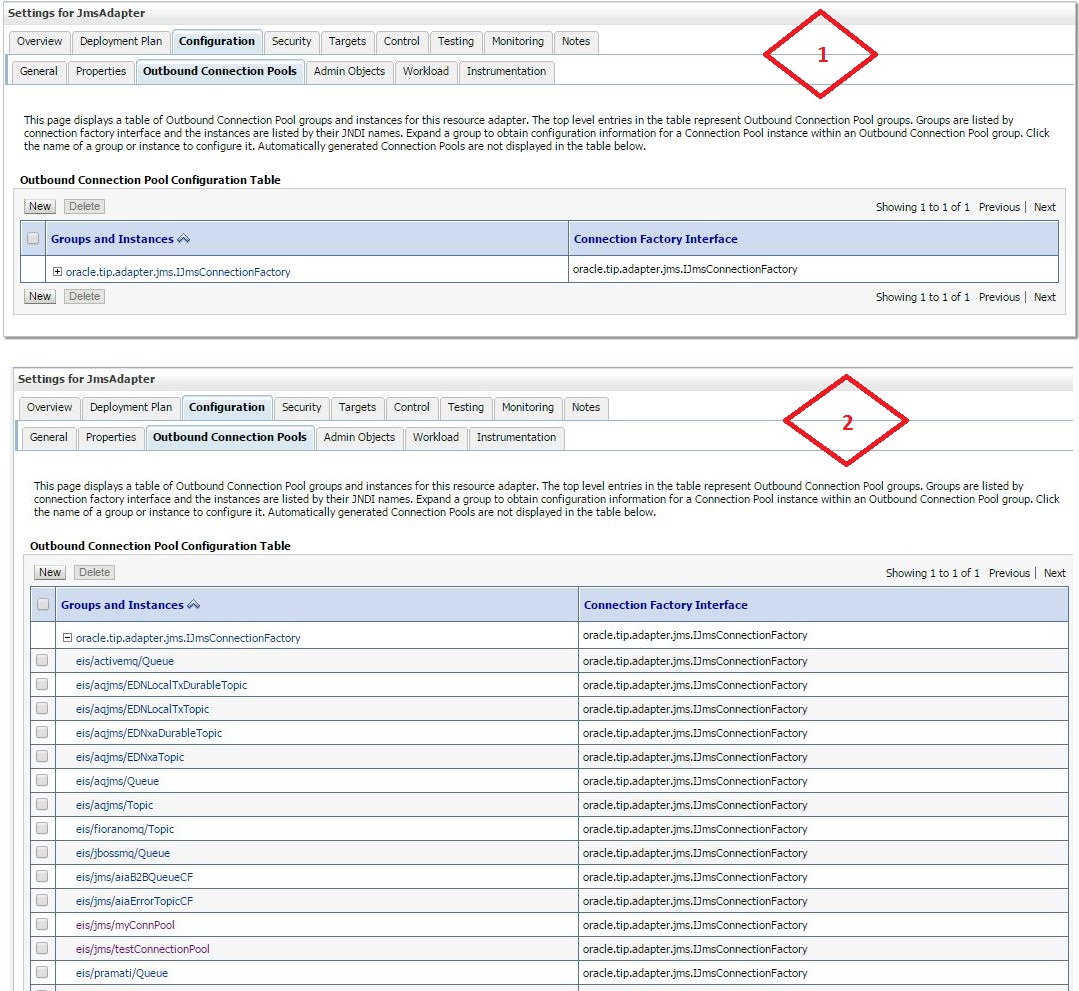
- Now navigate to Deployments -> JMS Adapter -> Configuration -> Outbound Connection Pools

- Click on New button to create new connection pool and select outbound connection group
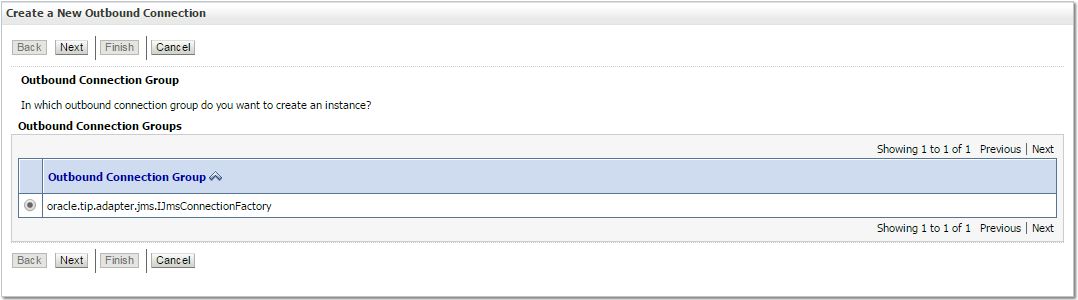
- Enter JNDI name for outbound connection instance (eis/jms/testConnectionPool)
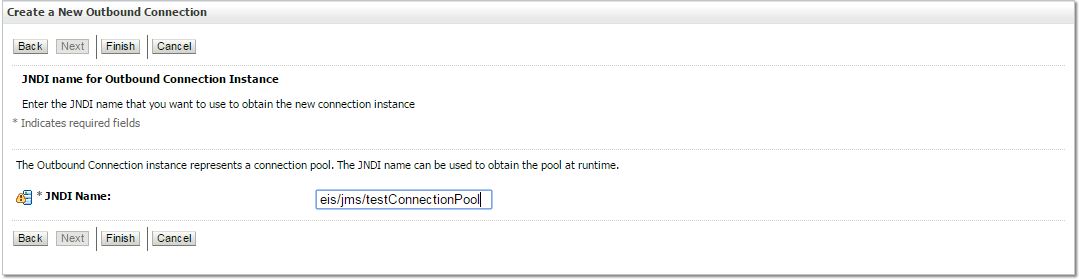
- Click on Finish button and then select the connection pool which is created in the previous steps. Check the below screenshot
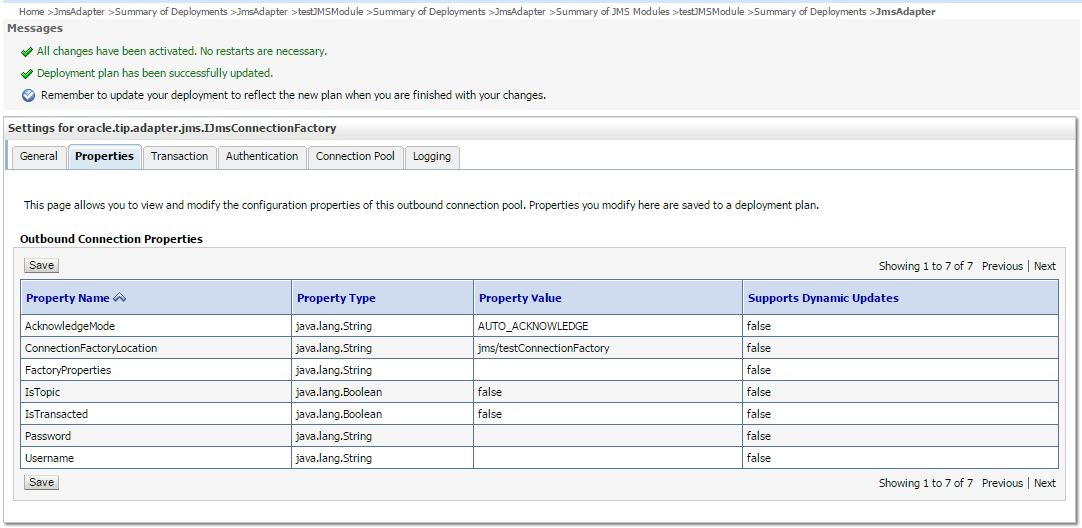
- Navigate to Properties tab and enter connection factory name in the ConnectionFactoryLocation property. You have to explicitly press enter button after entering connection factory name.
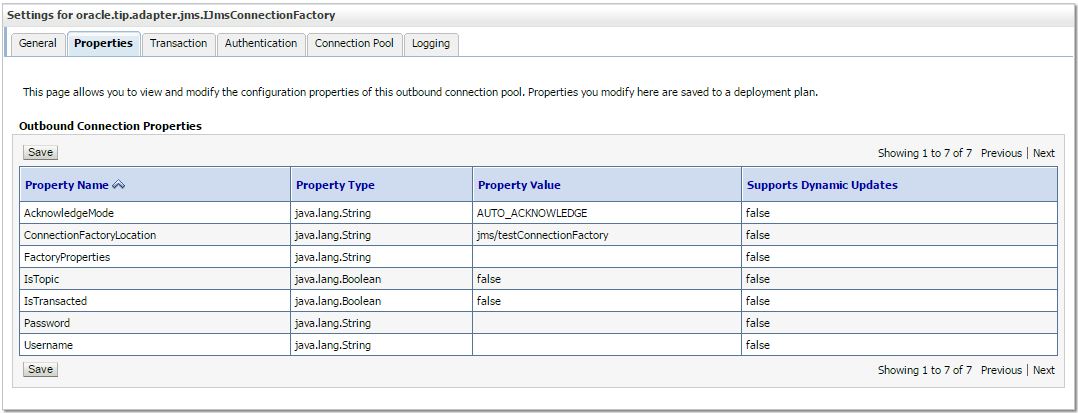
- Click on Save button and you will get successful message as shown in the below screenshot.
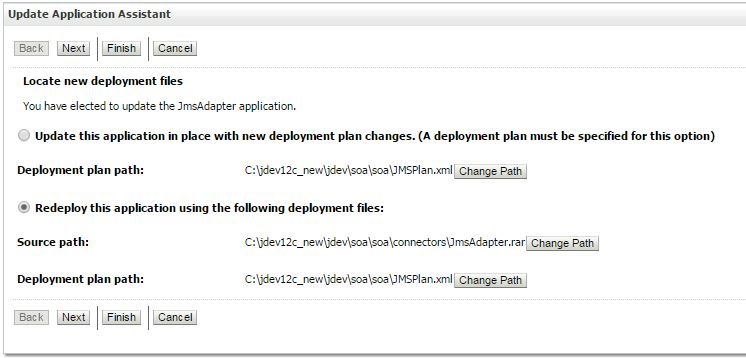
- Update JMS adapter deployment file (JMSPlan.xml). Navigate to admin console -> Deployments -> select checkbox of JMS adapter
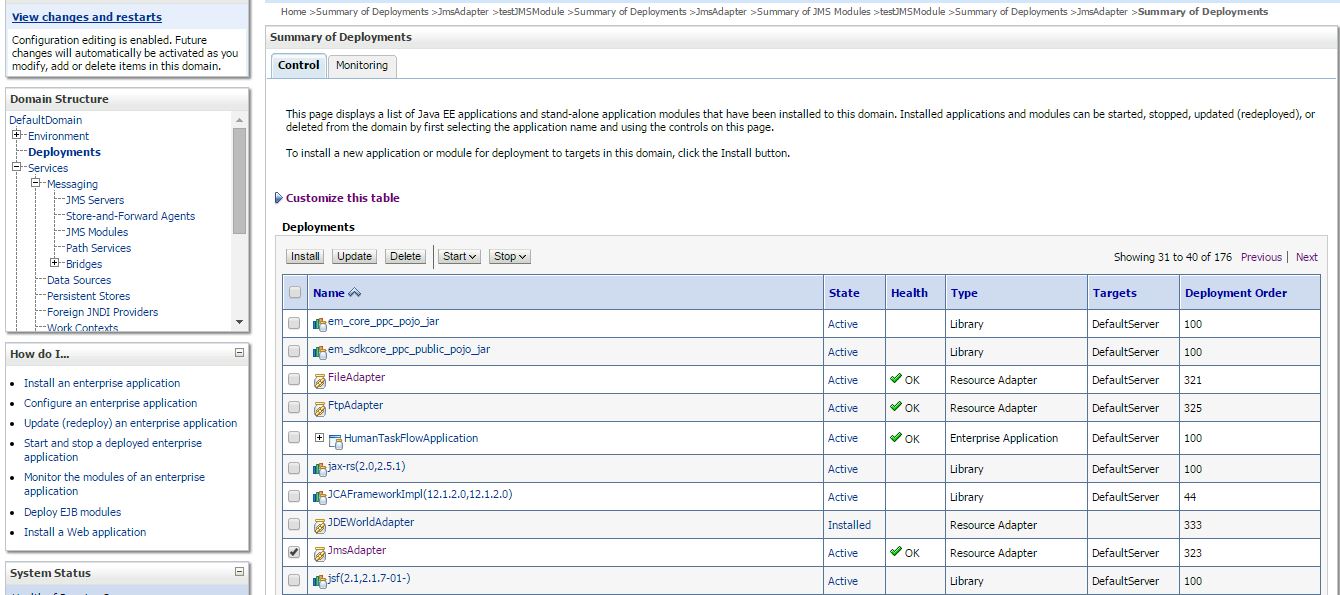
- Click on Update button and select redeploy this application Click on Finish button.
Now you can use eis/jms/testConnectionPool in your SOA composite.
You can refer my next posts on JMS adapter to see the usage of connection pool for messaging service.
 The Humanizer is a platform created by technology domain experts to inspire innovative, hence simple, thoughts for a better social living.


